Tag Archives: manuscript

How much does an editor cost?

One concern of a writer getting ready to publish is how much an editor will cost. I’ve seen much resentment on all sides, from professional editors accused of high fees, from writers convinced the editor is charging far too much, and from those who charge very low fees and are surprised that others get upset.


So just what is a reasonable fee editing a novel? First of all, ask yourself some questions.

How long have you spent on your novel?

Just for fun, take a rough guess at how many hours you’ve spent on your novel. Bear in mind that in the NaNoWriMo challenge, some writers have managed to churn out 50,000 words in 24 hours, working flat out. Then there’s the time spent staring at the screen, trying to work out the best way of phrasing something. And the time spent working out your plot and whether things happen in the right order.

How long would it take to read through your novel?

If a reader were to sit down and read through it, how long would it take them? Okay, reading speeds vary, but you can get a rough idea. If we take a very rough estimate of 100 pages per hour, at 250 words per page, that’s 25k words per hour. And that’s reading very fast, not taking in every detail. So for a nano novel you’re looking at two hours minimum for a readthrough. That’s the reading time for an edited, published novel, though, not for a raw manuscript that still might need a lot of work. That can easily take four or five times that reading time.

How long would it take to edit your novel?

How long do you think it would take for someone to read through your novel carefully, line by line, making notes, checking every word, ensuring it all makes sense, ensuring continuity, and becoming as familiar with the text as you are?  This is very hard to estimate, so I would suggest that as an absolute minimum, take the reading time and multiply it by ten. The time taken will vary widely with the quality of the original writing, of course. Some texts only need a clean-up, while others will need a lot more work, entailing not only close reading but constant checking backwards and forwards. Novels written by someone who is not a native English speaker can be even more complex.

What’s a decent hourly rate?

The minimum wage in the UK is around £7 an hour. The recommended rate for editing in the UK is £20 – £30 an hour plus, depending on level of edit needed and quality of writing to be edited (Society for Editors and Proofreaders).  Editors with a great deal of experience might well ask for a higher fee, while some jobs are more complex than others. Don’t forget that an editor is also usually self employed, so responsible for covering their own tax, pension, sickness cover, holiday pay, training, national insurance and costs of running their office, such as heating and lighting. Admin also takes up part of their time, so time available to do paid, chargeable work is reduced accordingly. One estimate is that of any hourly fee they take in, around 75% maximum is actual net income, so here we’re talking about earning around £15 an hour net.


Look at those figures in relation to your estimate of time taken. What do you notice? For your nano novel, we’re talking about a minimum of around 20 hours of editing, at £140 minimum wage or £600 recommended rate. And most novels are more like twice that size. As the size grows, so does the complexity of the edit. For the 100k novel, we’re looking at a very rough estimate of £280 ($360 approx) at minimum wage and £1200 ($1500 approx) recommended rate. And that’s  for the bare minimum level of work on a very clean original. If you’re paying a lot less than this, then what’s happening?

Why are some editors much cheaper?

You will always be able to find editors offering to work on your novel for a low fee. This probably means one of the following:

  • They’re just setting out in business and trying to get experience and testimonials.
  • They cut corners and don’t give your work the time it needs (some may well just run the spell and grammar checks and claim to have edited your work).
  • They’re just editing as a hobby, and the money is an extra bonus.

Each group has its own drawbacks:

  • The first group lack experience and are likely to be inundated with requests. They will either buckle under the pressure or soon find they can’t afford to work at that rate for long and their fees will rise with their experience level.
  • The second group – well, just don’t expect them to add much quality to your novel. If you’re lucky, they won’t actually do any harm.
  • The third group forms more of a grey area. On the one hand, if your writing is a hobby, then maybe a hobby editor is suitable. I’m sure there are some out there who can consistently offer a good service at or near minimum wage. On the other hand, they are likely to lack the experience that a professional editor has gained over many years of working in the business, or they might be tempted to rush through the job or not understand the full implications of editing.

How hard is it to edit?

Editing is a highly skilled job, but a good edit is invisible, so it’s far too easy to get the idea that anyone can do it. A little knowledge can be a dangerous thing – be very careful of editors who apply rules rigidly, for example. In all writing, but especially with fiction, an editor needs to understand when a rule may be broken, and be aware of regional variations in usage, among many other issues.


Editing is not just a question of being good at grammar, punctuation and spelling. Your editor should also be drawing up a style sheet – noting anything from whether to use anymore or any more, or where to hyphenate, to whether John has blue eyes or brown, and the fact that Jane is left-handed and lives in a bungalow. The style sheet can be very complex, for example if writing fantasy, and will be used to check consistency throughout the manuscript in conjunction with a style guide that advises the editor on whether capitalisation is needed, where italics should be used, how to deal with abbreviations, and many other issues.


If they’re carrying out developmental editing, they may well also have many other tools such as a timeline they can check against and a way of checking the progress in each scene for balance between action and backstory.


A fiction editor also needs to understand the intricacies of issues such as consistent point of view, consistent use of tenses and how to retain the author’s style while polishing it ready for publication.


Always remember that there are three aspects to editing, as in many things: good, cheap and fast. You can always get one of the three, and usually two. But three out of three? Never! Which are you willing to sacrifice, and which is most important to you and your novel?



Your first chapter

Within the first few pages of a book, a reader decides whether to continue or to give up. Writers focus a lot of attention on those first few pages, and with good reason. But what should you be looking for?


Don’t get stuck on your first chapter. Write something, anything, and then keep going on the rest of your novel. But when it’s time to edit your work, pay close attention to that first chapter, and how you use it to set up the rest of your book.


One issue that I often discover when I beta read is that at first I struggle to find my way in the book world. Is this a fantasy world? Is it our world? Are we talking current day, past or future? Who are these people? What’s the relationship between them? Who should I be focusing on?


These days, we tend to prefer books that go straight into some sort of action, but is that action detailed enough for readers to pick up what they need? You don’t have to explain everything at once, but make sure there’s enough detail to be able to follow.


Book two (or three or four) of a series provides a special problem. It’s so tempting to follow straight on from the previous book, but you know these characters and situations far better than the reader, who might have a large time gap between books. Are they going to remember that character? Are they going to remember the setting? Do they understand the significance of that event? What about the reader who glances at book two without realising it’s a sequel? Will they be interested enough to find the backstory, or will they be completely lost?


All this is why putting a manuscript to one side for a while and then reading with fresh eyes is a very good idea. Then make sure you read what’s actually written, and you don’t fill in the blanks with your memory. Is it clear who that person is? Have you indicated the time, the setting, the main drive of the story? Is the genre clear (or at least hinted at) from the start?


Sometimes, all it takes is a few extra words, or an extra scene, to make the difference between an opening chapter that leaves the reader floundering and one that pulls them onwards, already deeply engrossed in your story.


Writing books – The 38 Most Common Fiction Writing Mistakes

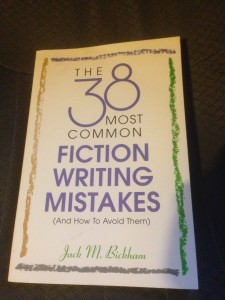
38 most common mistakesThe 38 Most Common Fiction Writing Mistakes (and how to avoid them) by Jack M. Bickham is a slim but useful volume. It covers a wide variety of topics, each in a fair depth – most chapters are two or three pages long, explaining the nature of each mistake and how to avoid it.


Topics start with Don’t make excuses – suggestions to avoid the procrastination that all writers seem to suffer from to a greater or lesser degree. They continue with topics such as Don’t expect miracles, Don’t lecture your reader, Don’t ignore scene structure, Don’t ever stop observing and making notes, Don’t ignore professional advice, Don’t forget sense impressions, and finishes with Don’t just sit there.


The advice is sensible and thought-provoking, with probably more on general plotting and structure principles or the process itself than on specific writing issues. While this book is unlikely to directly influence your writing, it could help your attitudes and beliefs about your work.


The book is available in kindle or paperback, and the kindle version is available on kindle unlimited. There are more thorough books out there, but this does work as an interesting, relevant read as a present for a new writer, or as a general motivational book. Generally, though, there shouldn’t be anything in here that comes as a big surprise to any regular writer.


Planning tools – storyplanner

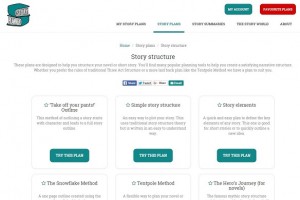
storyplannerThere are many different approaches to planning a novel. Do you start with characters and a setting and see what happens? Do you plan out every detail thoroughly before starting? How do you structure the content?


One tool that offers to help you with all that is www.storyplanner.com, a website where you can find a collection of different templates to complete online. There is a selection of plans to choose from, many well-known, such as the Snowflake method or the Three Act structure, as well as other, lesser known methods that are equally useful. Other sections on the website include facilities for developing your characters and your story world, and creating a summary or synopsis of your novel.


Plans can be created and then downloaded for further use, in Word, PDF or text format. A free membership allows you to create one story plan, which would need to be deleted in order to create a new one, while premium membership allows unlimited plans.


The variety of plans means that you are bound to find something that suits your method of working, and the advice that accompanies each plan will help you structure your thoughts and develop your ideas. Screenplay plans are included alongside those for novels and those applicable to either medium. The ability to favourite plans is an added bonus, as you start developing your planning skills. Links take you to further information on some of the plans.


I’m currently trying out this site for my own projects, and I’m finding it’s a useful way to keep my ideas together and organised. As it’s online, it also means that it’s accessible from just about anywhere. As a bonus, it also appears to be fully accessible from tablets, meaning that planning is easy to do while out and about, as long as you have internet access.


Writing books – The Story Grid

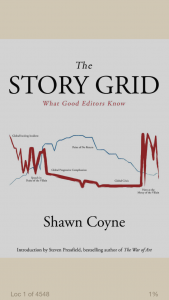
2015-09-23 10.37.53The Story Grid by Shawn Coyne is subtitled What Good Editors Know. This is another book that looks in detail at story structure, but from a different angle than the Blueprint your Bestseller that I looked at previously.


Coyne looks at two ways of analysing a book: the Foolscap Global Story Grid breaks a book down into its essential components, as a check that the basic structure is sound and clear, while the Story Grid Spreadsheet looks at each scene in more detail, recording the change in mood, turning point, length of scene, POV and other aspects. Both these sections take Silence of the Lambs as a reference point, analysing it in depth and applying the methods to the text.  I found this a little irritating, as it has been many years since I read the book and I’m not sure I ever saw the movie, so my lack of familiarity with the sample text made these parts a little harder to follow.


However, what I did find very useful with this book is the in-depth look at genre, both in the sense of genre fiction and in the sense that every book falls into a specific category of book. Each genre has its own rules and conventions, and these are laid out for some genres at least in great detail. This came to mind recently when I read a thriller that did not follow those conventions, and I did indeed find that it fell flat because of this.


Story arcs are also looked at in depth, with the arch-plot, the mini-plot and the anti-plot discussed in detail, as well as the interplay of external and internal content genres.


Most or all of the material is available online, at www.thestorygrid.com, and I would suggest that before considering buying the book you take a good look at the website and the resources there. You can see a summary of the techniques used on the resources page. The paperback book is rather expensive, at £25, while the kindle book at just under £5 is better value, but I found it a struggle to view some of the images, especially on a kindle device, which doesn’t have the same facility as an iPad to zoom in on images. However, it is useful to have the text all in one place for easy access.


There is a lot of useful material in this book, and it is well worth looking through. It emphasises the necessity of knowing the rules in order to break them deliberately if you feel appropriate, rather than ploughing on without understanding them in the first place, and the fact that understanding your genre is essential to producing a strong book. The grid is a good way of checking that every part of your story is strong, while the foolscap method is a good check that the overall arc is clear. Both techniques together will tighten up your writing and reduce flabbiness that fails to drive the story forward. This is not a book for the writer just starting out, but if you’re nearing the point of thinking about seeking publication in some way then this would be very useful. It would also be useful for any beta reader to bear in mind, although there is always the fear that a little knowledge is a dangerous thing, and I would hate to see anyone applying these rules rigidly without understanding why they exist or when they may be broken (a bit like the rules of writing itself, in fact!).


Writing books – Thanks, but this isn’t for us

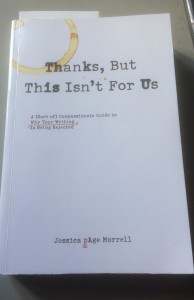
2015-09-08 14.46.48While the previous writing-related books I’ve reviewed have been suitable for any active writer, this one isn’t for the faint-hearted! I would definitely suggest that Thanks, But This Isn’t For Us by Jessica Page Morrell, subtitled A (Sort of) Compassionate Guide to Why Your Writing Is Being Rejected, is aimed at the more confident, polished writer who is nearing the point of either seeking an agent or publisher or getting ready to hit the self-publish button.


Written by a developmental editor who claims to have been called the Angel of Death by a critique group she ran, this book goes through all the common problems she sees in manuscripts. For each category she looks at, such as first impressions, she gives a detailed explanation of that aspect, why it is important and what it needs to include. She breaks down the categories of what she sees as the dealbreakers (dud prologues, trying too hard, not enough happening, too much happening), all with detailed explanations of how and why they are a problem, and then gives options for improving that aspect (dialogue, anecdote, suspense, theme, setting). Examples are given from published works and from novels she’s come across that have problems (heavily disguised so as not to embarrass anyone!). Each chapter concludes with exercises and tips for your own work, and a list of further resources.


The fourteen chapters include first impressions, plot, style and language, conflict, avoiding dialogue disasters, characters and writing memoirs. The final chapter is entitled Driving an Editor Crazy: Goofs, Gaffes and Howlers That Sink a Manuscript (dippy and oddball names, creepy sex scenes, fact checker breakdown, head hopping, inconsistent voice…).


There is also an epilogue that covers living the writer’s life, with tips and advice on how to make writing more than just a hobby. The first section, entitled Toughen Up, maybe should have been at the front! The book concludes with a glossary of relevant words – “The lingo of writing; The lingo of publishing” – which covers relevant words or phrases, such as crucible, inciting action, subtext, earn out, imprint, remaindered; all the vocabulary that the author wants to be able to use intelligently in discussions about their craft – or rather about their business, because this really is the attitude that the author is expecting from her readers.


There is a lot of valuable material in here, to the extent that I feel it would be off-putting to the writer who is relatively new to the craft. The author really does not pull her punches, and is almost intimidating in her fervour (“If I sound like a badass on these pages, keep in mind that I’m a pussycat compared to the suits in the publishing world. You know, the folks who send out the rejection letters.”). However, close reading and analysis would probably help any writer on the cusp of publishing standard to figure out any remaining problems and tidy things up.


If you’re putting your first novel together, then there are plenty of other books out there to hold your hand and guide you gently. If you’re submitting and not getting the results you want, or are about to take that first step of sending your work out to find a publisher, then this book would be a very useful addition to your library. If you’re self-publishing, then the responsibility to make sure your work is of publishable standard rests on your shoulders.


The interior of the book is clearly laid out, with clear headings and subheadings. Checklists are included for your own work. The writing style is clear and to the point. I love the simple but effective cover design on the paperback, and at just under 350 pages it’s a fair-sized book. The kindle version isn’t much cheaper than the paperback, and in this case, as in most writing books, I’d definitely recommend getting the paperback version.


Preparing your manuscript for print – headers

Assuming that you’ve followed instructions for setting up your manuscript, including using styles and including section breaks before each chapter heading, preparing for a print version is reasonably straightforward.


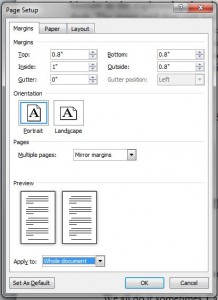
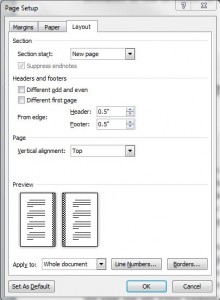
First of all, you must use Page Set Up to set up your page size and margins appropriately, including instructing the file to Mirror Margins on Multiple pages. This enables you to either set up a wider inside margin or a gutter space (which has the same effect as a wider inside margin). This allows for the inside edge of the pages to be bound together. Use your printer’s guidelines in creating your margins, and don’t fall into the trap of trying to cram as much onto each page as possible.

margins

Under the Layout tab, tick the Different odd and even and Different first page options under Headers and footers.

header footer setup


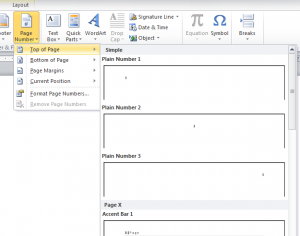
In many books, the header or footer simply contains a page number, and these can be added easily in Word by choosing Insert/Page Number/Top of Page or Bottom of Page, then selecting which position and option you require.

insert page numbers

You may wish to have more information in your header, however. For example, many non-fiction books will have the book title on one side of the page and the author name on the other, so while the left and right pages are consistent throughout they do not match each other. Some may even have the book title on one side and the chapter title on the other, so while the book title side remains consistent throughout, the chapter title side changes for each chapter. At the very least, unless you have the page number bottom centre, it should appear on the outside of each page, so swapping from the left to the right. The first page of each chapter will normally have no header at all.


You can access the Headers and footers options by double clicking in the header or footer area of any page, or by clicking on Insert/Header and choosing the Edit header option, and similarly for the footer area.

header footer toolbar

Here, again, make sure that Different First Page and Different Odd & Even Pages are ticked. Different First Page enables you to leave the first page of each section (each new chapter) without a header.


A very important button on this toolbar is the Link to Previous. While this is turned on, the header in the current section (either odd or even) will be the same as the corresponding header in the previous section, so any change you make to this one will affect that as well. If they are all linked, then changing one will change all. This is the setting we want for the header that’s to be the same throughout – for example having the book title on the left hand (even) page.


Unlinking the headers, by turning off that Link to Previous button, means that you can set each header for that side manually. Use the Previous and Next buttons to skip through the sections. This means that you can set up the chapter title to appear on every right hand (odd) page.

alignment tabs

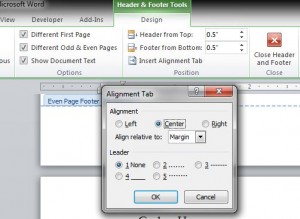
Use alignment tabs to centre the header – on the Header and Footer Tools, select Insert Alignment Tab and choose Center. You will need to add a right alignment tab for the page number when you want it on the right. When putting the number on the left, be careful if your Normal style includes a first line indent – you will need to turn this off for the number or it will appear in the indented position, or apply the non-indented version of Normal.


Page numbers should follow on automatically between sections. You can format their appearance by choosing Header and Footer Tools/Page Number/Format Page Number, should you require a section to be numbered differently, or in a different style. For example, a lengthy preface might be numbered with small Roman numerals, with the actual numbering starting with the text itself.


Check all your headers and footers very carefully (or your proofreader will check them for you) to ensure they are all correct.


Compiling your work from Scrivener

The PDF version of these instructions is here: Compiling your work from Scrivener.


Once you have finished writing your novel (congratulations!) you need to be able to export it from Scrivener for use elsewhere. While it is possible to compile straight to ebook format from Scrivener, I would recommend compiling to an intermediate format such as RTF (which is Word compatible), where you can play with formatting and check for last-minute errors before the final compile.


There are three basic ways you might have organised your files within Scrivener:

You might have just one folder with all your files in.

simple structure

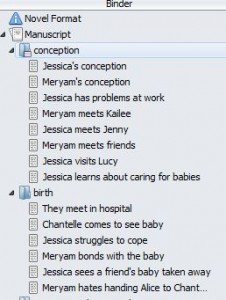
You might have folders for each chapter, each containing at least one scene.

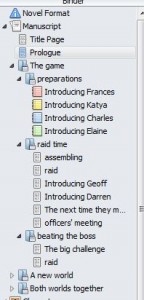
basic structureYou might have a more complicated structure, such as a prologue and parts, each part containing chapters, each chapter containing scenes, plus an epilogue at the end.

complicated structure

You can see I’ve also been playing around with the icons for the scenes! 


The basic structure for compiling is the same, whatever your structure.


compile buttonClick the Compile button on the toolbar, or select File/Compile.


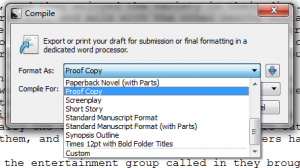
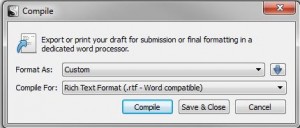
The short version of the dialog box gives you options to choose – for the complicated structure, you need to choose a format that says (with parts). Otherwise choose whichever option you want: ebook, paperback or standard manuscript, for example.

compile dialog

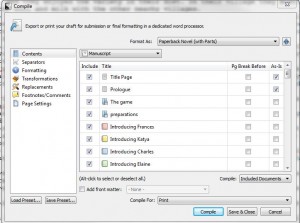
Clicking on the blue down arrow on the right shows the full functionality of the box.

compile dialog full

Under Contents you need to check that all the files you need to include are ticked. Any that don’t fall into the main structure, such as a prologue or epilogue, need the As-Is box ticked.


Scrivener will number any folders as chapters and if you have the part/chapter structure (here you can see a part called The Game containing a chapter called Preparations) then Scrivener will number them accordingly as long as you have chosen a structure with parts, so don’t include chapter/part numbers within the folder names.


There are several tabs of options for Compile, so I suggest you play around with them and see what the end result is. One you particularly need to look at is Transformations.


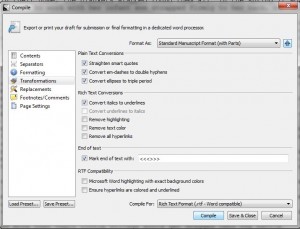
Click on Transformations on the left to see transformation options.

standard compile transformations

Here you see the Transformations options for a Standard Manuscript, which includes straightening smart quotes and converting italics to underlines. You might want these options turned off, depending on what you intend to do with the file.


When you are finished with the options, check the file type you are compiling for and then click on Compile, and you will be prompted to save the file somewhere and give it a name. I would recommend saving as RTF (rich text format), which can be viewed in most word processors.

Be careful!

You now have the Scrivener version of your novel and a compiled version. While some compiled versions, such as ebooks, will not allow you to edit them anyway, there is a big danger with other versions that you make changes to this file and not to the master version in Scrivener. Once you start working on the compiled version, it can be fiddly to get the work back into Scrivener, so be aware of issues if you send a file to a beta reader, editor or proofreader. Make sure that you are prepared to transfer changes back to the Scrivener version, or continue your work on the compiled version only. This is why I recommend using Scrivener to write and edit your novel, then switching to a word processor for the final tidy up, format and proofread before exporting to PDF for print versions or MOBI/EPUB for ebook versions.


Getting started in Scrivener

With Nanowrimo almost upon us, many people are trying out Scrivener for the first time, so I’ve put a guide together to help you. Click on any screenshot to see it larger. You can also download a PDF version Getting started in Scrivener if you would rather print the instructions out to have next to you.


First download and install your Scrivener trial – currently the best link is from http://www.literatureandlatte.com/nanowrimo.php – this is a special nanowrimo trial that will last until 7th December.


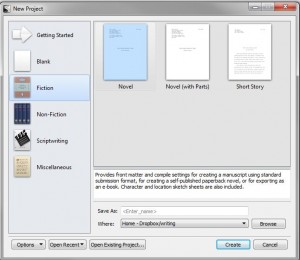
new projectCreating a new project gives you a few options. I would suggest sticking to Fiction for nano if it’s your first time using Scrivener.


Give your file a name and choose where to save it – I always save mine to Dropbox as I can then access it via PC or laptop.


setting up


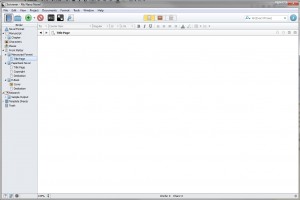
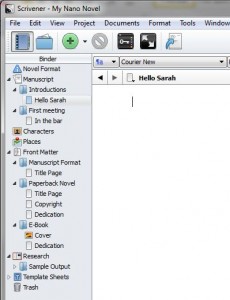
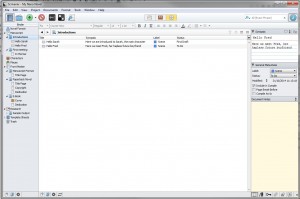
When you click Create, this is what you will be faced with. On the left is the Binder, which organises all your documents. Use the triangles to expand and contract your structure. Typing happens in the main area.

Building your structure

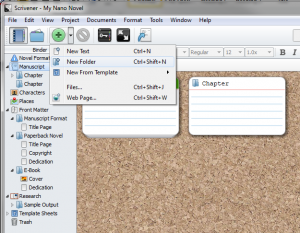
create new folderClick on Manuscript in the Binder. Click on the triangle next to the green Add Item button and choose New Folder. There is already one there, called Chapter.


Name your folders as your Chapter titles.


On each folder, click on the green Add Item button (or on the triangle next to it and select New Text)  to create a scene in the chapter, and give each scene a name.


part projectYour organisation can be as complex or simple as you like – here, under Manuscript I have two chapters (folders), each with one scene (text document), but each chapter can contain several scenes. Just add a new one when you need it, via the Add Item button. You can drag and drop folders and files in the Binder to change the organisation.


There is also a folder labelled Research, where you can create and store any documents containing notes rather than actual manuscript. Ignore any other folders for now – just worry about Manuscript and Research.


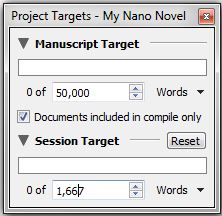
project targetsClick on Project/Project Targets and set up your manuscript target as 50,000 and your session target at 1667 (or whatever your daily/session target is). See those bars change colour as you get closer to your target. Scrivener will keep track of your overall word count for the project and each session, whether you work on one scene or split your time between several.


Click on the scene you want to write and get started! Jump between scenes by clicking on the scene name in the Binder. Add a new scene/chapter as you need it or set up your complete structure in advance; the choice is yours.


Don’t worry about saving – Scrivener saves as you go along. If you are switching machines and using Dropbox or other cloud storage, just give your machine enough time to sync between closing Scrivener and shutting the computer down, and between turning the next one on and opening the project.

Using the Inspector

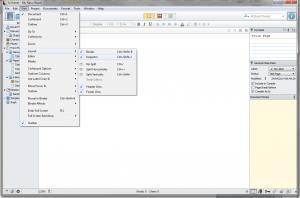
turn on inspectorIf you want to make fuller use of Scrivener, I suggest you start with the Inspector.


Click on View/Layout/Inspector to turn on the Inspector pane on the right. This gives you options to record information about each section.


InspectorHere I have added a synopsis of the scene. There is meta data that you can play with, to label the type of document (scene, character notes, idea, notes), and a status you can set. You can use the ones already created, or you can create your own by using the Edit button at the bottom of the list of options.

labels


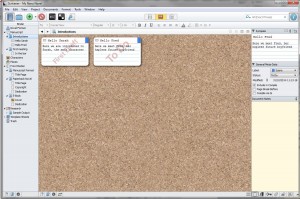
Click on a chapter folder and then Corkboard button on the top middle of the screen to see the synopsis cards. You can drag them around to change their order.


corkboard

outline viewOr click on Outline View to see a different view of your structure. You might have to resize columns so that you can see all of them in the window. You can use Outline View on your Manuscript and expand each chapter, to get an overview of your complete novel, as well as on individual chapters.


Click back on an individual text file to continue working on that file.


compileIt’s a good idea to compile your project every so often to produce a backup version. Click the Compile button or choose Project/Compile. There are a variety of settings – I usually use these for backups. This produces a straightforward text document that can be read in most word processors.


Most of all, have fun writing!


Using Styles in MS Word 2010

Advantages of styles

Using styles is a handy way to help you ensure your formatting is consistent throughout your document. Styles can also help you to navigate through your file and see the structure easily, and if you intend to convert your Word file to ebook format, styles will enable you to generate an automatic table of contents.


Applying styles

The styles options appear on the Home ribbon. You will see several different styles listed, including Normal, Heading 1 and Heading 2. You may also have a Title style.


style bar

Each of these styles may be applied to your document by highlighting the text and then choosing the style you want.


It is important that you use the right style for the right section; it is less important what the style currently looks like, as it is easily modified.


Most of your document will be created in the Normal style, and you should use Heading 1 for chapter headings. Highlight the chapter name and then click on the style named Heading 1. If you have subheadings, you can use Heading 2, etc.


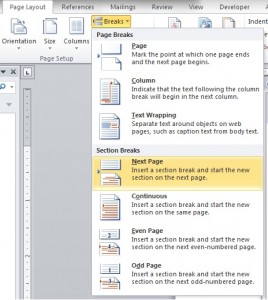
section breakAt the end of the chapter, in order to make the next chapter start on a new page, use a Section Break (Next Page) or Section Break (Odd Page). Both are found on the Page Layout ribbon, under Breaks. Using Odd Page will ensure that the next section starts on the right-hand page of your book. All odd pages should be on the right-hand page – please note that the Word two-page preview does not always display this properly.


pilcrowUsing the Show/Hide button (on the Home ribbon) to see the invisible characters will help you with your formatting. This button lets you see the characters that are normally invisible, but that control the layout of your document.

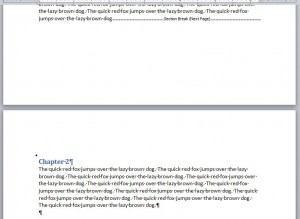
formatting example

Here you can see:

  • the section break used rather than leaving blank lines manually
  • the chapter heading formatted using Heading 1
  • the pilcrow mark used to show paragraph marks
  • dots instead of spaces.

Modifying styles

modify style

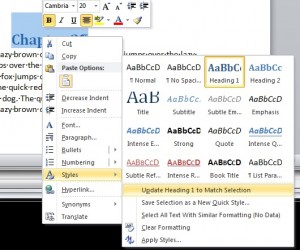
If you want to change the appearance of either of the styles used, choose one heading or one paragraph to change. When you have that one exactly as you want it, then highlight it, right-click and choose Styles/Update Heading 1 to Match Selection or Styles/Update Normal to Match Selection. This will automatically make your changes to every section of text where that style is applied.


More about modifying styles in my next post, on using paragraph formatting.

Using styles to navigate

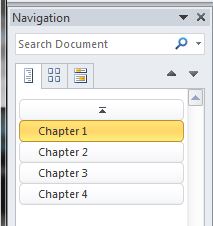
navigation pane

If you turn on the Navigation Pane (found under the View ribbon) you will see a list of the headings you have used. Clicking on these is a quick way to jump around your document, and if you have subheadings, for example in a non-fiction book, you can see the structure very clearly.


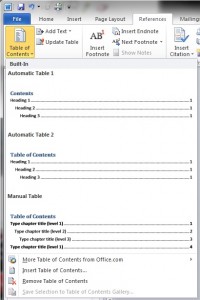
table of contentsMoving to the top of your document and choosing Table of Contents on the Reference ribbon will give options for an automatic table of contents, with or without page numbers. These will be hyperlinked to each heading, so that Ctrl+clicking on a heading will take you to that point in the document, and this will translate to the ebook file as well. If you generate the Table of Contents before your text is finished, then you can right-click the generated table later and choose Update Field, choosing the option Update entire table, to ensure that the table is up to date. Alternatively, make the Table of Contents the last job you do when finished.