Author Archives: Lin White

Using paragraph formatting in MS Word 2010

So you’ve applied your styles, using Heading 1 for your chapter headings and Normal for the main text. You can format the headings easily and then update the style to make the same change throughout the document. The last thing to do is to format your body text appropriately.


Standard layout for an ebook or printed book is to indicate new paragraphs by indenting the first line. You should also avoid adding extra blank lines anywhere by using the return key. For both of these you need to access paragraph formatting.


Paragraph formatting dialog box
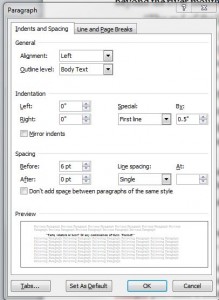
 

paragraph formattingWithin the paragraph formatting dialog box there are several areas of interest. You can format the alignment here – left, right, centered or justified.


You can add indents to left or right – if you want to set in a paragraph from the margins – or set a special first line indent.


You can also add space before or after the paragraph. This is the best feature to use if you want your headings to appear lower down the page, or have a gap between the heading and the text.


You can set your linespacing at various depths, including single and fixed spacing.
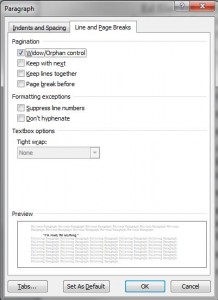
 

line and page breaksOn the other tab for the paragraph dialog box is Line and Page breaks.


The most interesting of these is Widow/Orphan control – when ticked, this will stop the first line or last line of the paragraph appearing on a different page from the rest. You might decide you prefer this option turned on, or you might turn it off if you want exactly the same number of lines of text on each page. If you do turn it off, I suggest you look at the layout of your print design carefully to check for widows and orphans, as it’s possible the automatic system could give you a single word on its own at the end of a chapter.


Keep with next will ensure there is no page break between a paragraph of this style and the next paragraph – useful for ensuring headings don’t appear on their own at the bottom of the page.


Keep lines together will ensure the paragraph is not split between pages.


Page break before will automatically start a new page with this paragraph – again, useful for headings.


Accessing the Paragraph format box


paragraph section of home ribbon

  • Click on the right-hand bottom corner of the paragraph section of the Home ribbon.


  • Right-click the text and select Paragraph…


If you access it either of these two ways, once you have the paragraph the way you want it to look don’t forget to right-click the paragraph and select Styles/Modify Normal to match selection.
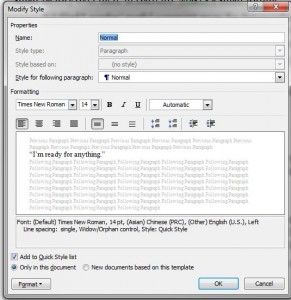
 

modify styleAlternatively, you can right-click on the style in the style panel, choose Modify… and click on the Format button in the bottom left-hand corner. Choose Paragraph from the list of options. This method modifies the style directly, so you should see the change applied throughout when you press OK.


The first paragraph in the chapter or underneath a divider should not be indented, so it’s best to set up another style to cover this. Add in a centered style for your dividers (and maybe any images you wish to include) and you’re ready to go!


Using Styles in Open Office Writer

Advantages of styles

Using styles is a handy way to help you ensure your formatting is consistent throughout your document. Styles can also help you to navigate through your file and see the structure easily, and if you intend to convert your Word file to ebook format, styles will enable you to generate an automatic table of contents.


I have covered styles in more detail in the Word version of this article, so here I will only give you where to find the various features in Open Office Writer:

Applying styles

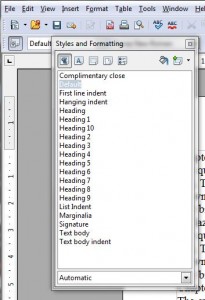
formatting toolbarYou will access the styles option in Open Office Writer by selecting Format/Styles and Formatting, or by clicking the Styles and Formatting button on the toolbar (on the left). Apply the style by highlighting text in your document and double-clicking the style you want.


Use a page break to force a new chapter onto a new page – under Insert/Manual break… page break, or by typing CTRL+Enter.


Modifying styles

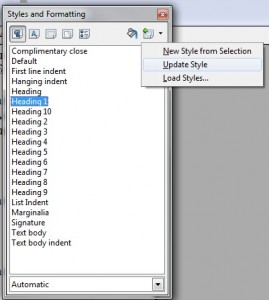
update styleTo modify a style, change one of the sections of text that uses it. Then, with that section highlighted, on the formatting window use the dropdown button to choose Update Style.

Using styles to navigate

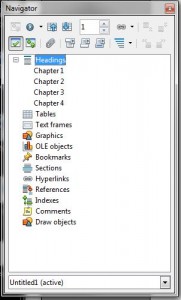
navigatorUse the Navigator pane, under View/Navigator, to move around the document and see the structure. Expand the heading section if necessary by clicking on the plus sign to its left.

Table of contents

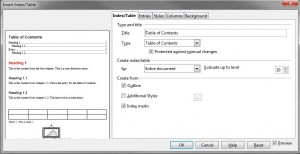
table of contentsUse Insert/Indexes and Tables/Indexes and Tables to insert a table of contents.


Using Styles in MS Word 2010

Advantages of styles

Using styles is a handy way to help you ensure your formatting is consistent throughout your document. Styles can also help you to navigate through your file and see the structure easily, and if you intend to convert your Word file to ebook format, styles will enable you to generate an automatic table of contents.


Applying styles

The styles options appear on the Home ribbon. You will see several different styles listed, including Normal, Heading 1 and Heading 2. You may also have a Title style.


style bar

Each of these styles may be applied to your document by highlighting the text and then choosing the style you want.


It is important that you use the right style for the right section; it is less important what the style currently looks like, as it is easily modified.


Most of your document will be created in the Normal style, and you should use Heading 1 for chapter headings. Highlight the chapter name and then click on the style named Heading 1. If you have subheadings, you can use Heading 2, etc.


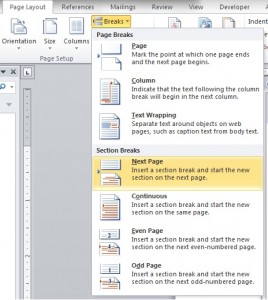
section breakAt the end of the chapter, in order to make the next chapter start on a new page, use a Section Break (Next Page) or Section Break (Odd Page). Both are found on the Page Layout ribbon, under Breaks. Using Odd Page will ensure that the next section starts on the right-hand page of your book. All odd pages should be on the right-hand page – please note that the Word two-page preview does not always display this properly.


pilcrowUsing the Show/Hide button (on the Home ribbon) to see the invisible characters will help you with your formatting. This button lets you see the characters that are normally invisible, but that control the layout of your document.

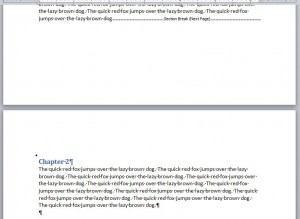
formatting example

Here you can see:

  • the section break used rather than leaving blank lines manually
  • the chapter heading formatted using Heading 1
  • the pilcrow mark used to show paragraph marks
  • dots instead of spaces.

Modifying styles

modify style

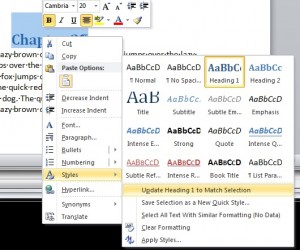
If you want to change the appearance of either of the styles used, choose one heading or one paragraph to change. When you have that one exactly as you want it, then highlight it, right-click and choose Styles/Update Heading 1 to Match Selection or Styles/Update Normal to Match Selection. This will automatically make your changes to every section of text where that style is applied.


More about modifying styles in my next post, on using paragraph formatting.

Using styles to navigate

navigation pane

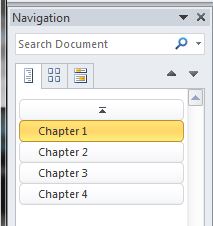
If you turn on the Navigation Pane (found under the View ribbon) you will see a list of the headings you have used. Clicking on these is a quick way to jump around your document, and if you have subheadings, for example in a non-fiction book, you can see the structure very clearly.


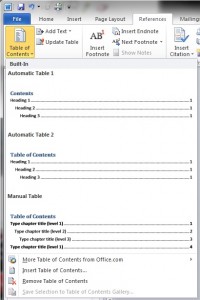
table of contentsMoving to the top of your document and choosing Table of Contents on the Reference ribbon will give options for an automatic table of contents, with or without page numbers. These will be hyperlinked to each heading, so that Ctrl+clicking on a heading will take you to that point in the document, and this will translate to the ebook file as well. If you generate the Table of Contents before your text is finished, then you can right-click the generated table later and choose Update Field, choosing the option Update entire table, to ensure that the table is up to date. Alternatively, make the Table of Contents the last job you do when finished.


Typing your manuscript

Here are a few tips to remember when typing up your manuscript:


  1. Use single spaces only, even at the end of a sentence. If you are an old-school typist, as I am, you were probably taught to use two spaces after a full-stop, but this is inadvisable on a computer. Some eBook converters will complain if they find two spaces together, and there is always the risk that one space will be put on the next line, forcing that line out of alignment with the rest.
  2. Avoid using blank lines in your document. It is best to put a visual marker instead. If you really want blank lines in a finished printed manuscript, you can adjust them once the page sizes are known, but in eBooks you can never guarantee where the page breaks will fall, and it is very easy to miss a blank line at the top or bottom of a page. For this reason, ebook converters will complain if you upload a document with blank lines.
  3. Indent the first line of each paragraph using the automatic settings in your word processing software. The usual style these days is to have no blank lines between paragraphs in fiction, and so the way to signal a new paragraph visually is to indent the first line a little. However, using the tab key or space bar to do this is a bad idea, as it makes it fiddly to adjust at a later date.
  4. Use section breaks or page breaks at the end of the chapter, to push the next chapter to the top of a new page. Section breaks also give you the option to choose whether you want next page or odd page starts, and allow you to change the header and footer between sections.
  5. Make use of the style system. Marking your headings using styles is not only a handy short-cut to keeping your formatting consistent, but it is the key to generating a Table of Contents for the front of the book, and if your book is non-fiction, then the navigation pane will help you check that your content is organised appropriately. 
  6. Avoid using the space bar to align content on the page. Instead, use the left-align, right-align and centre buttons. For anything more complicated, you can always set and use the tabs, or use a table and hide the borders.

If you follow these simple rules when typing up your manuscript, the final formatting should be smooth and easy.

More information on using the style system and section breaks.


Writing tools 2 – Aeon Timeline

Further to my post on Scrivener, a tool growing in popularity with many writers, another tool that’s well worth a look at is Aeon Timeline.


Whether your novel spans decades or takes place over a few days, the chances are that you have a sequence of events to organise – how long does that journey take? what day of week did they meet up? was there really enough time between those events for that to take place? It can be a real headache trying to keep track of what happens when and where, and if you are trying to balance different story arcs the headaches are multiplied.


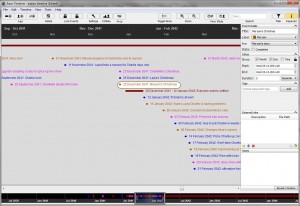
Aeon simple view

Aeon simple view with Inspector open

Aeon Timeline is very simple to use, while providing many tools that are useful for organising your planning.  The timeline across the top shows the date, the events are listed in order on the timeline and at the bottom a bar shows how the current view relates to the overall timeline. Colour coding can be used for different events, and they can be events for a single moment in time or longer events, recorded to within the degree of accuracy you need, whether this is to within the year, the month or even the second.


Clicking on any event on the timeline gives access to the details of that event – here you can record which story arc it belongs to, the time and duration of the event and any other details you need. You can also provide a link to an external file – in fact the mac versions of Scrivener and Aeon Timeline will link with each other, so you can generate a scrivener file from your timeline and keep the two synced. The windows update for this feature is currently in development, and will be made available as a free update when released.


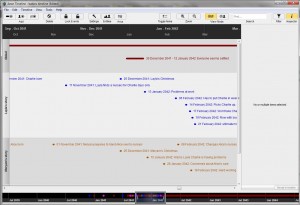
Aeon timeline arc view

Aeon timeline arc view

Having linked each event to a story arc, it’s very simple to switch to arc view. Here each arc is separated out to aid planning. You can zoom into and out of the timeline easily to obtain an overview or to see details, either by using the zoom buttons or the CTRL key and scroll wheel, and scroll backwards and forwards along the timeline by dragging the handle at the bottom.


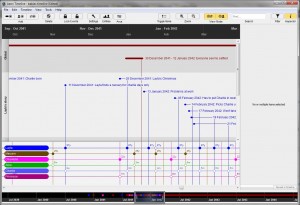
Aeon entity/arc view

Aeon entity/arc view

Another useful feature is entity view. This enables you to create entities – people or places for example – and link them with the events on the timeline. You can also create birth and death events for people, and once you have created a birth event, each event that you link with an entity will keep you informed as to their age – a very useful feature that also helps you avoid linking them to events outside their lifespan.


Each entity may be linked as an observer or a participant, enabling you to keep track of whose point of view the section is to be written in. Again, colour coding plays a large part in planning out your timeline.


It’s very easy to combine simple view, arc view and entity view in any combination, to see different parts of your project in detail and check the timeline is feasible. The reminder of day of the week and time of year is also useful – having given a season for one event, you can clearly see what point in the year other events happen.


To create a new event, you either click on the button to create your arc, entity or event, or double click in the right place on the timeline. Either way brings up a dialogue box for you to enter and adjust details. Events may be dragged along the timeline either singly or in groups. A simple filter system enables you to see all the events affecting a specific entity, or with a specific tag, arc or label.


Timeline creation options

Timeline creation options

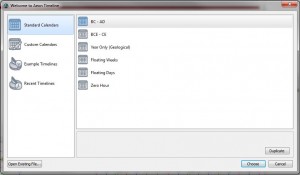
Options for creating a timeline include floating timeline, zero hour and geological. This should cover any project you could possibly conceive of!


I’ve been using Aeon Timeline for a while now, and find it very straightforward and useful. When they produce a Windows version that will sync with Scrivener, there’ll be no stopping me, but in the meantime the two programs even run separately provide me with every assistance I can think of.


Aeon Timeline is available as a free trial. It is, of course, useful for more than just fiction writing, and videos, forums and support are all available from the website. There are other features available, such as import/export and printing, but I feel I have covered the main features that, to me, make this an essential part of my writing toolkit.


Writing tools 1 – Scrivener

The beautiful thing about writing is that it can be done almost anywhere, almost any time, and needs very little specialist equipment. A cheap notebook and pen and a bit of space to work is all that is necessary, but many projects demand a little more in the way of organisation.


Most people will use either Microsoft Word or Open Office as their main word processor, and either has the tools needed to create the main document for your piece of writing.


However, if you are creating a large project, for example a full novel or non-fiction piece of work, you might find that you struggle to keep all the different parts of your project organised. That’s when a program like Scrivener comes in.


Scrivener main window

Scrivener main window

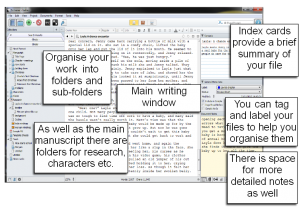
Scrivener provides an easy way to organise chunks of writing, by labelling each chunk, tagging with key words and statuses and providing an overview that is easy to rearrange.


With this program, you work in smaller files, which are usually scenes or chapters, and you can label them and rearrange them as you wish to form a larger project. There is also the facility to store other files that are not part of the main document, whether these be character notes or general research. You can even include PDFs or images within your Scrivener project folder. This makes it far easier to work on different areas of a large project.


Scrivener corkboard view

Scrivener corkboard view

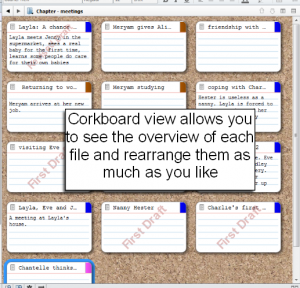
Having labelled these files/scenes, it is also easy to rearrange them. Those index cards that you filled out for each file are available on the corkboard, where you can easily see the overall structure and change it around as much as you wish. Colour coding helps to see, for example, how different points of view are arranged, and you can also see the status of each part easily.


Scrivener outliner view

Scrivener outliner view

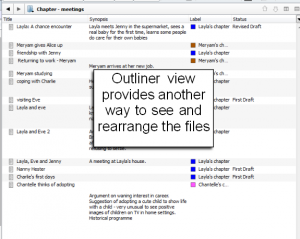
Another way of looking at the structure of your project is through the outliner window. This gives similar information to corkboard view, but in a different format.


Although Scrivener offers many features, probably more than most writers will use, a comprehensive tutorial offers a guide into what the software can do, and I found it quick and easy to get to the point where I could use it for my own work. Now I just dip back into the tutorial whenever I need to find out how to do something new, like filtering the projects by label or keyword, or adding and editing footnotes/endnotes.


Scrivener even saves your work automatically, so no more accidentally losing large chunks because you forgot to hit save! You can take snapshots of any section before working on it, so that you can compare versions later on, or roll back changes if after hours of work you decide that the first version was better.


At any point in your project, you can generate a view that merges all the files into one long file for easier reading, and when you are ready to move on you can compile the project into a text file suitable for formatting in a word processing program.


Scrivener comes in both Mac and PC versions, and is available as for a free 30 day trial should you wish to play with it before parting with your money. I find it so easy to organise my work with it that  now I couldn’t imagine tackling a long project without it.


The new computing curriculum and web science

There have been many arguments over the new computing curriculum. The more I look at it, the more concerned I am that it appears narrowly focused on programming, whereas computing can involve so much more.


One case in point is the course I’m currently studying at FutureLearn, the Open University’s contribution to the MOOCs (massively open online courses) currently sweeping the web. This particular course, sponsored by Southampton University, is called Web Science: how the web is changing the world. It looks at the effects the world wide web is having on society, and how we have influenced the web.


The topics it covers are ones that are important to understand, and that I spent time in the classroom trying to get across – that technology is new, but pervasive, and affects our lives in more ways than we can imagine. In fact, the same topic is covered in a book I’m currently reading in order to review: Digitized: The Science of Computers and how it shapes our World.


If children are truly to understand the importance of coding, and to be able to express themselves effectively using digital media, then they also need to understand the deeper concepts of computing, for example how it can help us to build a better world, and to better understand our own minds.


I haven’t done much resource creating for the past few months as I left my teaching post in July and have been focusing on other aspects of my business, but after a break away from classroom technology and learning for a bit I’m now getting restless and starting to look for ways that I can help schools make the move forward from office-based computer skills to real computer skills. If anyone has any suggestions – or anyone in the Canterbury, UK area (or online) would like practical help – then please do get in touch. I will be resuming my quest to produce teaching materials in January, but not being in a classroom regularly makes it a little harder to keep up with the practical side of things.


Incidentally, there’s another MOOC coming up that ICT teachers really should be seeking out: Teaching Computing part 1 (part 2 to follow) from the University of East Anglia, which aims to prepare teachers to teach the new computing curriculum in both primary and secondary sectors. The course lasts for 4 weeks and is expected to take up around 4 hours per week, but of course anyone seeking to teach computing should be prepared to devote time to it – my biggest fear is that computing will go the way of ICT, with too many non-specialists stumbling through and not giving the subject the rigour that it deserves.


How do I beta?

Please note that this is how I personally work – it isn’t a rigid way that the job must be done. I suspect there are as many different ways of working as there are beta readers. Also, this service is bordering on an alpha read or critique, rather than just a beta read.


When an author contacts me I’ll book them in and let them know when I expect to get to their project. Sometimes I can take one on immediately, while at other times I’ve run a waiting list of up to six months. When I receive the file, either in  Word or PDF version, I start an Evernote file for the work, giving title, author and page count (with word count if known). I add any synopsis or other information I’ve been given, plus any specific things I’ve been asked to look out for. I put the date I received the file and any deadline or estimate for finishing. I also confirm to the author that I’ve successfully opened the file and saved my own copy to work on. It helps if I also have some information on the writer’s experience and their intentions for the manuscript (generally, seeking an author or self-publishing).


As I read, I make notes in the project file – like a running commentary, on something I don’t understand, something that makes me laugh, something that’s inconsistent… I’ll also add general comments in the Evernote file under heading such as Setting, Plot, Characters, POV.


At the end of a session I’ll note in the Evernote file where I’ve stopped, and I’ll also summarize what’s happened in this session, so it’s easier to pick back up after a day or so away. This is also a good way of assessing the plot – is it easy to say what happened in each chapter? Did too much happen to explain quickly? Did things just drift along with nothing really happening at all? Is it clear at this point what the main character wants and what’s standing in their way?


I try to read at least 50 pages from a project in a session. Any fewer and it takes too long to get through, and it also becomes bitty in my mind and hard to keep straight. Any longer and I lose concentration – although if a book is close to the end of the development cycle and there is less to comment on I can become more involved and get further in the session. I might switch projects and continue if I still have time available, but I have to be aware of other work that has to be done as well, and in order to keep the beta fee as low as I can, I have to prioritise the higher-paying work.


When I’ve finished a project, I’ll wait until the next day to compose a report for the author. This allows my thoughts to gel. Sometimes I’ll go back and re-read the opening, adding a couple more comments – things that were unclear to start with sometimes come clearer on a second read, or things that seemed unimportant are noticed more – or important things are missing.


I’ll then write back to the author, attaching the project file with the comments, and include a general report as well. Sometimes the author has further questions for me, and I’m happy to carry on the conversation with them, and clarify anything. However, it’s entirely up to them what notice they take of my feedback. I also focus on finding and explaining problems, rather than how to fix them.

Beta reading is not like normal reading

For a start, I can only beta read either on my computer or on my laptop, so I can add comments. Beta projects are often unpolished, and therefore do not flow as easily as finished works, and this can slow down the reading considerably. I’ve had projects where I’ve had to train myself to ignore punctuation because, the use of commas, is fairly arbitrary making it, impossible to use it to, help with understanding.


I often have to go back and re-read sections, especially in the first few pages. What have I taken in? What have I missed? Has the author introduced too many characters too quickly? Is there too much background information given, rather than getting straight to action?


I’m constantly questioning what I read, and this means that I have to check facts – what exactly was she wearing? Did we get told she changed clothes? Is it possible she changed but we weren’t told? How many days have passed? What day of the week does this work out as?


This means that beta reading takes far more time and concentration than normal reading. It is not a way to get free books to read! It requires time and patience, and a good understanding of how books should flow. It requires tact and patience in explaining issues to the author. I am not – at that point, at least – the book’s editor or proofreader, and I will not point out every single mistake (more on the different roles in another post) but I will point out consistent errors and issues, and I will point out when a sentence does not get its message across clearly. I can pick up dictation errors if the author has used dictation software. I will point out where punctuation/grammar obscures the meaning. I will also point out general writing weaknesses, such as inconsistent points of view or over-reliance on adverbs, if necessary.


The read is focussed on the structure of the story, and while it is not in the depth required by a developmental or structural edit, it should provide plenty of information to help you identify the strengths and weaknesses of your novel and point you towards how to improve it.


All this makes for an enjoyable but challenging way of helping authors to produce their book. It is also a good way for the author to get to know the way I work, and for me to get to know the author and the story, before discussing any further editorial/proofreading work they may require. Part of the beta fee may be deductible from the final fee.


How can a beta reader help?

It’s important to understand how a beta reader can fit into the development of your writing. Making the best of all the resources at hand will lead to a higher quality end product, and after putting all that effort into your book, it makes sense to follow through properly.


A beta reader isn’t a proof reader. They aren’t an editor. They do not even need a high standard of written English themselves. But the one important thing about a beta reader is that they are a reader, and preferably one who enjoys the genre of books you’ve written and understands how stories* work.


You should expect a beta reader to read your novel* and give honest feedback. They should comment on characters, plot and flow of the novel. They should leave you with a better understanding of how your novel works for a reader: which bits are unclear, which bits are boring, which bits really help the reader imagine the scene, whether the characters work well. They should point out any inconsistencies they come across, and any plotholes they notice. Some might offer to correct errors for you, but please remember that they are not professional proofreaders, and as there are likely to be plot/structure changes needed as a result of the beta reading, it’s a little early to worry too much about spelling errors and typos. Some writers like to give a beta reader a questionnaire to fill in, or a set of targeted questions, but you should not expect a fully detailed critique of your novel. Remember that the beta reader is reading for free, or for a very small fee, and is not necessarily a writer themselves. They should, however, be able to explain whether a book works for them, and give reasons to justify their answer.


You can find beta readers via a site like goodreads, or kboards, or you could ask friends or family – but if you know the beta reader personally, you need to make it clear that you’re not looking for a cheerleader (although they can serve their purpose!) but for constructive criticism. Some established authors have websites or facebook pages where they have built up a network of people who may be called on to help out, but at first you might need to try out a few people and see who responds in good time, who gives useful feedback and who really isn’t worth the effort of sending your work to. As long as they respond in reasonable time and you find their observations helpful, it’s worth putting them on a list for future runs. Remember that they are reading in their spare time; don’t nag them daily, but you should be prepared to set a deadline and/or give them a nudge if you hear nothing for more than a couple of weeks. Usually you would be expected to provide either a Word document or a PDF format, but some beta readers prefer an epub. Personally I prefer to add comments to a Word document or sticky notes to a PDF. This does limit my reading to the computer or laptop, but it means I can add comments as I go through.


A beta reader should be contacted once you have a complete draft you want feedback on, but before you start to consider an editor. You can choose whether to build up a close relationship with one beta reader or use several, which gives you the benefit of a variety of opinions but can be more time-consuming to manage. You aren’t obliged to implement everything a beta reader might suggest, of course, but if two or three people suggest a passage drags then that’s an area you should definitely focus on, and likewise if a passage is confusing or unbelievable, or if there are plotholes noticed, or repeated issues with a character. 


If you feel you want more help than a beta reader can offer, some editors are willing to work closely with you on the plot; this is called substantive editing, and can be expensive, depending on the experience and ability of the editor. Bear in mind that you are expecting this person to spend a lot of time with your work, and to go through it thoroughly; all this is time-consuming, and the editor has to charge a sensible amount in order to make a living. On the other hand, you should make sure you are happy with what they offer before agreeing to the work. Most editors will give a free sample edit so that you can see how compatible you are. Some editors might be willing to provide a cheap beta read/critique along with a sample edit. This will provide you with basic feedback and allow them to see whether they feel they can help you. Again you are not obliged to follow their suggestions, unless the editing is provided as part of a publication deal, but why pay for someone’s advice if you are unwilling to follow it?


Once you have considered carefully all the feedback from the beta reader(s), it’s time to redraft, and depending on the amount of changes made you might feel you need another beta read. Take your time, and redraft/rebeta as often as you feel you need, but remember that you will never, ever reach a point where you feel your novel is perfect! Just make sure you have done the best you can before you hand it over to an editor for a final polish.


* I have spoken here about novels and stories, plotlines and characters, but of course what I say applies to other types of writing as well, for example memoirs and other non-fiction. You may, however, find it harder to find beta readers willing to help you out for these other types of writing. This is one example of where a paid beta might be useful or necessary.


For further information see my article How do I beta?

More on BBC Basic

Since my previous post about BBC Basic I’ve been looking into the topic further, and it appears the language might have something going for it after all – it’s very similar to the pseudocode used by OCR, and OCR seems to be supporting it, as they have provided training materials using BBC Basic to illustrate solutions.


One problem the language does seem to have is a lack of materials available, so I decided to have a go at remedying that, and have produced a KS3 workbook, similar to my Python workbook, which provides guidance into the first few steps of programming – input, output, variables, IF statements and loops – using BBC Basic, including simple exercises. My intention is that the booklet provides enough information for the more able students to progress by themselves, while others will benefit from extra guidance from their teacher.


I myself missed out on BBC Basic, as by the time it was introduced in schools I was at the top end and about to leave, but I did start off with Sinclair Basic, which was very similar. I do miss the old days of line numbering, but I have to admit that these days it’s far easier! If there is a generation of teachers out there who need to learn how to teach computing in a hurry and they’re already familiar with – or even just have a passing acquaintance with – BBC Basic, then capitalising on that would seem to be a viable way forward.


I intend to look further still into BBC Basic and pseudocode, as students are expected to understand pseudocode anyway for OCR GCSE Computing, and being able to write programs in pseudocode that translate directly into executable code would be useful, but I do feel that there needs to be some sort of introduction to another language as well. Watch this space for more news on training materials.


I remember reading once (a long time ago, admittedly!) that universities don’t want students who have already learned a programming language because they get confused when learning a second, but on the other hand those who already have experience in two find it far easier to learn a third. I myself have found that it’s the thinking and planning skills that are vital – once you understand exactly what you are trying to do, finding the exact syntax in the language of your choice becomes the easy bit. It’s like learning to drive a car – when you first learn, you’re bothered by every small difference in another car – the side the indicator is on, the biting point of the clutch – but once you gain more experience you’re aware of the differences and can work better with the similarities.