Author Archives: Lin White

Writing books – The Emotion Thesaurus and others

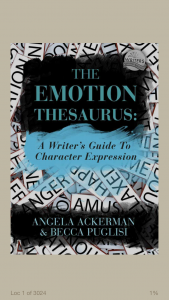
2015-09-16 09.40.42The Emotion Thesaurus is one of a collection of books by Angela Ackerman and Becca Puglisi, the others being The Positive Trait Thesaurus, The Negative Trait Thesaurus and Emotion Amplifiers. The first three are available in paperback or kindle versions; the last is a free, small kindle-only volume, and works as a good introduction to the others.


The Emotion Thesaurus contains 75 emotion entries, ranging from adoration through nostalgia to worry. Each entry includes a definition (for example, Terror: a state of extreme fear), a long list of physical signals (ranging from images like flaring nostrils to behaviours like spinning around, trying to spot any and all danger), internal sensations (weak legs), mental responses (risk taking), cues of acute or long-term terror (insomnia, hallucinations), indications of how that emotion may escalate (paranoia, rage), cues of that emotion being suppressed and writer’s tips. Each of the entries offers a couple of pages of words and phrases. In the kindle version, there is a handy link back to the table of contents, as this is not the sort of book to be read linearly.


The book also contains general advice on writing emotions, and a guide to using the contents of the thesaurus.


The Positive Trait Thesaurus and the Negative Trait Thesaurus are on similar lines. A guide at the front of the book gives guidance on creating believable, rounded characters. Then the main thesaurus lists different attributes, A definition is included, a guide to similar flaws/attributes, possible causes, associated behaviours and attitudes, associated thoughts, associated emotions, positive aspects, negative aspects, examples from film, overcoming this trait as a major flaw, and traits in supporting characters that may cause conflict. There is a wide range of traits included, with several under each letter of the alphabet. Smallest category is XYZ, containing only Zealousy, while several letters contain more than twenty entries.


The free Emotion Amplifiers book is much briefer, but covers topics including addiction, attraction, boredom, hunger, illness, pain and stress, plus a sample of the other books in the series.


These books are ideal for any writer who is seeking to widen the range of emotional description, covering multiple suggestions for describing just about any characteristic or emotional state you could think of. The Positive Traits and Negative Traits book would also be invaluable in the creation of rounded characters, whether you want to create a flawed hero or a well-rounded bad guy. While I found the paperback versions a little expensive, there’s no doubt that the physical book would be useful. However, the link to the index at the end of each chapter makes the kindle version perfectly valid as an alternative.



Writing books – Thanks, but this isn’t for us

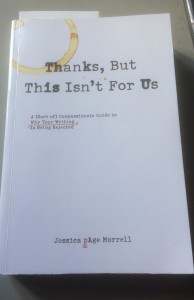
2015-09-08 14.46.48While the previous writing-related books I’ve reviewed have been suitable for any active writer, this one isn’t for the faint-hearted! I would definitely suggest that Thanks, But This Isn’t For Us by Jessica Page Morrell, subtitled A (Sort of) Compassionate Guide to Why Your Writing Is Being Rejected, is aimed at the more confident, polished writer who is nearing the point of either seeking an agent or publisher or getting ready to hit the self-publish button.


Written by a developmental editor who claims to have been called the Angel of Death by a critique group she ran, this book goes through all the common problems she sees in manuscripts. For each category she looks at, such as first impressions, she gives a detailed explanation of that aspect, why it is important and what it needs to include. She breaks down the categories of what she sees as the dealbreakers (dud prologues, trying too hard, not enough happening, too much happening), all with detailed explanations of how and why they are a problem, and then gives options for improving that aspect (dialogue, anecdote, suspense, theme, setting). Examples are given from published works and from novels she’s come across that have problems (heavily disguised so as not to embarrass anyone!). Each chapter concludes with exercises and tips for your own work, and a list of further resources.


The fourteen chapters include first impressions, plot, style and language, conflict, avoiding dialogue disasters, characters and writing memoirs. The final chapter is entitled Driving an Editor Crazy: Goofs, Gaffes and Howlers That Sink a Manuscript (dippy and oddball names, creepy sex scenes, fact checker breakdown, head hopping, inconsistent voice…).


There is also an epilogue that covers living the writer’s life, with tips and advice on how to make writing more than just a hobby. The first section, entitled Toughen Up, maybe should have been at the front! The book concludes with a glossary of relevant words – “The lingo of writing; The lingo of publishing” – which covers relevant words or phrases, such as crucible, inciting action, subtext, earn out, imprint, remaindered; all the vocabulary that the author wants to be able to use intelligently in discussions about their craft – or rather about their business, because this really is the attitude that the author is expecting from her readers.


There is a lot of valuable material in here, to the extent that I feel it would be off-putting to the writer who is relatively new to the craft. The author really does not pull her punches, and is almost intimidating in her fervour (“If I sound like a badass on these pages, keep in mind that I’m a pussycat compared to the suits in the publishing world. You know, the folks who send out the rejection letters.”). However, close reading and analysis would probably help any writer on the cusp of publishing standard to figure out any remaining problems and tidy things up.


If you’re putting your first novel together, then there are plenty of other books out there to hold your hand and guide you gently. If you’re submitting and not getting the results you want, or are about to take that first step of sending your work out to find a publisher, then this book would be a very useful addition to your library. If you’re self-publishing, then the responsibility to make sure your work is of publishable standard rests on your shoulders.


The interior of the book is clearly laid out, with clear headings and subheadings. Checklists are included for your own work. The writing style is clear and to the point. I love the simple but effective cover design on the paperback, and at just under 350 pages it’s a fair-sized book. The kindle version isn’t much cheaper than the paperback, and in this case, as in most writing books, I’d definitely recommend getting the paperback version.


Writing books – Writing Active Hooks Book 1: Action, Emotion, Surprise and more

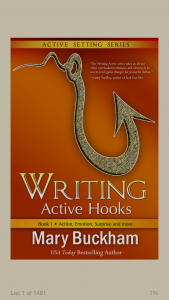
2015-09-02 10.44.32This is one of a series of books by Mary Buckham. She has books on writing active hooks, and writing active settings, and I think I’ll be working my way through them. This one is on Active Hooks, covering action, emotion, surprise and raising questions, with mentions of other types of hooks (book 2 in the series includes unique character hooks and foreshadowing among its topics, as well as placement of hooks). This book is only available as kindle version, costing around the same as a posh coffee, although I note that there is an omnibus edition available of the Active Settings series, with the Active Hooks as a bonus, in both ebook and paperback format, and I’m very tempted.


Hooks are “tools to engage readers and keep them engaged”, and the examples include ideas on how to control the tension within the hook, depending on what genre you’re writing in.


Each hook is introduced clearly, with each chapter including examples from popular fiction, plus worked examples where a simple sentence is enhanced to include a hook, or a variety of hooks, that pull the reader forward and make them want to read more. There are then practical assignments, such as going into a book shop, to a shelf you don’t normally read from, and picking up books at random to read their opening sentence.


This isn’t a particularly long book, but it provides a lot of detail on a specific topic, and is worth a look at if you feel your writing needs a little more jazz. As it’s a short ebook, it’s ideal to have on your phone app for those moments you’re out and about and need something to read. By itself, it’s not going to have a major effect on your writing, but if you’re at the stage where you’re confident on the basics of plot and setting and just want that extra oomph that will pull the readers along, then this would be well worth considering.


Writing books – Blueprint Your Bestseller

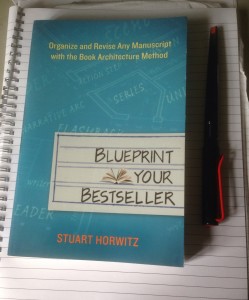
Blueprint Your Bestseller

I have a large and growing collection of writing-related and editing-related books, and i thought it might be useful to review a few of them.


The first book I’m looking at is Blueprint Your Bestseller, by Stuart Horwitz. This book is aimed at considering the overall structure of your book. It applies to both fiction and nonfiction – this book itself was written using the same methodology – and does not touch on topics such as point of view, dialogue or showing and telling. Instead, it shows how to break down your work into series, scenes and an overall theme. By considering how these series develop, and the scenes in which series converge, you can reach a deeper understanding of what your book is about, and how to improve it.


This book is best used once you have a rough draft – action step zero is to write around a hundred pages, so it’s ideal for helping you to make sense of your nano novel, for example. It then gives you  22 steps towards improving the structure and strengthening your content. These steps are practical and straightforward, when read in conjunction with the main text, and provide a clear way to produce a multi-threaded story, where the threads (or series) back each other up and support each other. For example, one step is to draw a target representing the theme that you’ve worked out, and to consider how close each scene is to that target.


Like many “structure” books, a worked example is given, but unlike some that rely on you having at least basic knowledge of the story under analysis, this one works with a commonly known fairy tale, The Ugly Duckling, and includes the full text of the tale, in both simple and annotated versions.


This is rapidly becoming a favourite of mine, and the techniques included are proving very useful when I carry out developmental editing.


How can a copyeditor help?

So what does a fiction copyeditor do anyway? In case you’re unsure, let me explain, with some examples of real errors that I’ve caught.


A copyeditor will go through your manuscript very thoroughly, checking for spelling, punctuation and grammar issues (SPaG). She (or he, of course!) will mark up errors for your attention. She will check for ambiguous meaning and suggest rewording if needed.

Errors may include:

  • The wrong word used: bought or brought; steel or steal; free reign or free rein; take a peak or take a peek; bare with me or bear with me; you’re mine or your mine
  • Inconsistent tenses: He picks it up and ran with it; she saw he is busy
  • Subject/verb agreement: Each of them is or each of them are
  • Inconsistent or incorrect punctuation: “Hello,’ he said. Where, are you going Tom”?

She will check for consistency within the manuscript, and create a stylesheet.

Errors may include:

  • Inconsistent word/digit use: one or 1; one hundred or 100
  • American or English spelling: color or colour, but not both; color and center, or colour and centre
  • References to time: 10am, 10AM, 10A.M., 10 a.m., etc

She will check for consistency within the characters, building a sheet to refer to for details, to avoid:

  • Eyes that change colour from blue to brown
  • An only child who phones her brother for help
  • Inconsistent spelling of a character name

She will check for consistency within the timeline, to avoid:

  • A school week that goes on for six days instead of five
  • A character who reacts to some news she doesn’t yet know the significance of
  • A baby that’s due in one week in one chapter, and in three weeks in the next chapter

She will check for consistency within the geography, to avoid:

  • A journey that takes far longer or shorter than it should
  • A side door in a mid-terraced house
  • Inconsistent spelling of a place name

She will check for factual errors:

  • Carbon-dating metal
  • A shotgun that fires bullets
  • Charles Darwin’s Theory of Relativity


A copyeditor cannot guarantee the accuracy of everything in your manuscript, but she can pick up most of the major errors and a lot of the minor ones, and ensure that the text produced is polished, accurate and easy to read.


She will also point out copyright issues, such as song lyrics, and can advise on other matters related to the publication of your manuscript.


She should not:

  • impose a style rule for the sake of it: you must use a serial comma; never end a sentence with a preposition; you must always use an en-rule/em-rule/hyphen here (although she may advise on common practice)
  • impose her own voice on the work: she should be reinforcing your voice
  • rewrite the story for you


All corrections made by an editor are subject to author’s approval, and all queries should be dealt with by the author. The job of an editor is a highly skilled one, and checking a manuscript carefully is time-consuming. Please bear that in mind when considering your budget!


I want to be a beta reader

I often see comments from people who would like to be a beta reader but are not really sure how to go about it. This is to answer some of the most common questions.

How do I become a beta reader?

Just find yourself a writer who needs a beta reader and volunteer. It might be through your local writing group, or through goodreads, or some other place where you can find writers. Good beta readers are always in demand, and writers are usually looking to build up a regular team.

What do I have to do?

The basic idea is to read the manuscript (often a novel, but it could equally be a memoir, or non-fiction), and then tell the writer what you thought of it. The important thing is to be honest and as specific as you can. They might have a list of questions they want answered – are the characters believable? did the setting sound realistic? – or they might just want your overall impression.

How long does it take to do a beta read?

How long do you usually take to read a book? Some beta readers can provide feedback within a couple of days; others take longer. As long as you and the writer understand how long it is likely to take, there is no problem.

Do I have to be honest?

Yes, but you also need to be kind. The writer has put in a lot of work, and you should always bear this in mind when you give feedback. it’s also good to comment on things that you enjoy or feel works well, so that your feedback is not all negative.

Do I have to be a writer myself?

No. You just have to be a reader. Make sure you read genres you feel capable of commenting on, and remember that the writer is looking for feedback to help make their work better. You don’t have to tell them how to fix any problems you find; you just have to point out anything you see as an issue. Is the pace flagging? Do you find the character unlikeable? Is that event unbelievable? Once you’ve pointed out what you see as a problem, it’s up to the writer to consider your feedback and deal with it if they consider it necessary.

Do I have to be good at grammar/spelling/punctuation?

No. It’s not the beta reader’s job to point out errors like that, although some do anyway. You are the test reader, giving the writer an idea of your response. The writer has spent a long time very close to their manuscript; they need someone to look at it with fresh eyes and check the content for them to see how readable it is.

How do I actually read their work?

It’s possible you might be given a printed copy, especially if you know the person offline. It’s more likely that you’ll be provided with an electronic copy. This might be a Word document, PDF, or a format suitable for an ebook reader. You can usually ask for the version that you would find easiest to work on.

Do I do a written report?

Some beta readers provide comments through the manuscript; some provide feedback via a written report. Some do a combination of both.

Do I have to sign a non-disclosure document?

Some writers might ask you to do that, but most don’t. However, it is expected that you’ll keep their work confidential and not pass it on to others. The same goes for discussing it with other people. On the other hand, once the book is published there’s nothing stopping you promoting it to your friends!

Can I charge for beta reading?

Some people do charge for beta reading. The advantage to you is that you get something back for your time apart from the pleasure and experience of helping out, and the advantage to the writer is that they can be pretty sure you’ll provide feedback. On the other hand, there are plenty of people around who offer a free read. Some writers offer a copy of the finished work as a thank-you, or a mention in the acknowledgements. If you want to make a charge, then I would recommend building up a reputation, collecting testimonials and then testing out the waters, but any beta read fee is unlikely to reflect all the time you spend working on it, unless your fee is very high – and then you’d better be very confident that you’re offering a high level of help and expertise.

What if I really don’t like what I’m reading?

It happens sometimes. A manuscript for beta reading can be very rough and unfinished, and can be tough to get through. Just do your best, and at the very least give the writer some feedback to indicate why you found it so hard, whether it was because the writing style was too rough, the main character too unsympathetic or the pace too slow. The tougher the read, the more important your feedback is. If you can’t finish it, then try to explain the problem.

What if real life intervenes and I just don’t have time?

If you take on a read and then find you can’t complete it, for whatever reason, please do let the writer know. The same applies if you find it will take longer than you thought. Communication is key. Remember that you may be the first to read a piece of work apart from the writer, and it is their precious baby. If they don’t hear back from you, they might assume it’s because you found it terrible and can’t bear to tell them, whereas in reality it’s because you’ve had the flu!


Beta reading, editing, proofreading, reviewing

A novel has to pass through many stages during its lifecycle. In my job I get to do all of them, although not usually more than two on any one project, as otherwise I start to see what should be there rather than what is there. So what’s the difference?

Beta reading

A beta read is for the author’s benefit. It provides feedback on the pace, the characters, the setting – anything that impacts on the structure and style of the story is fair game. When I beta read, I’m aiming to give the author an idea of the strengths and weakness of both story and style, and spot any plot holes or major omissions early in the publication stage, so they’re not too painful to fix.


Sometimes the beta read can be very tough (or, strictly speaking, an alpha read), and that’s when it’s even more important to really get stuck in and figure out what the problem is. As I make a small charge for a beta read, I’m going to make every effort to read the whole manuscript, and give you whatever advice I can.

What doesn’t get looked at

At a beta read stage I will not be worried about sentence structure except to comment on any style issues, or where the meaning is unclear or confusing. Nor will I be picking up on spelling mistakes or punctuation errors, unless to comment on those that are frequent/misleading.

Editing

An edit involves pulling the manuscript apart, to a greater or lesser extent. A structural edit can be very thorough, while a copy edit will be for consistency of plot and style. At this point I’m not only pointing out every error I see, but making suggestions on how to fix them. This is accordingly the most expensive and time-consuming of the types of read.


At the editing stage, depending on the level of editing booked, everything in the novel should be looked at.

Proofreading

A proofread is the final stage before publication. When proofreading, the aim is to pick up any last remaining errors and check for issues with layout. Because of this, the proofread should be carried out on the final file, or as close to that as possible, because every time the file is converted/changed there is the possibility of introducing errors – such as incorrect page numbers in a print document, or blank pages in an ebook file. The purpose of a proofread is to make sure the work is as error-free as possible, so that the reader does not get distracted by any issues with either the language or the layout.

What doesn’t get looked at

Style and structure.

Reviewing

With a review, the focus has changed. A review is not for the author’s benefit (although having public reviews of a book can help sales). A review is for the benefit of readers, to help to know what the book is about and to give them some idea of the strengths and weaknesses of it. When I review a book, I’m looking at how well it entertains and how well the style, structure, characters and setting work towards the end product, or if it’s non-fiction I’m looking at the purpose of the book, how useful it is and what sort of reader it would help best.


I very rarely review anything that I’ve worked on in earlier stages, because I’m too familiar with it, may have had a lot of input into it already and because my time is limited and I would feel the need to reread in order to check I’m reviewing the published version. However, as a member of the Amazon Vine programme I’m often offered books to read and review, and if I read anything for pleasure I will often review that as well.

What stage does your manuscript need?

At various stages in the production cycle, all these stages are needed. Please do not fall into the trap of assuming beta readers will deal with all the other stages. You might be lucky and get a brilliant beta reader, but even so, they are unlikely to have the experience and knowledge that an editor/proofreader brings. As an author, it is your responsibility to your readers to produce the best piece of work you can, and this involves making use of professionals in the process where appropriate.


Self publishing is not producing a book cheaply. It is taking on all the business costs yourself, overseeing the project yourself and collecting more of the income from it.


Preparing your manuscript for print – headers

Assuming that you’ve followed instructions for setting up your manuscript, including using styles and including section breaks before each chapter heading, preparing for a print version is reasonably straightforward.


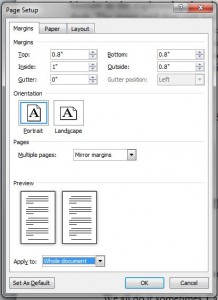
First of all, you must use Page Set Up to set up your page size and margins appropriately, including instructing the file to Mirror Margins on Multiple pages. This enables you to either set up a wider inside margin or a gutter space (which has the same effect as a wider inside margin). This allows for the inside edge of the pages to be bound together. Use your printer’s guidelines in creating your margins, and don’t fall into the trap of trying to cram as much onto each page as possible.

margins

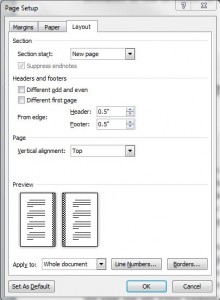
Under the Layout tab, tick the Different odd and even and Different first page options under Headers and footers.

header footer setup


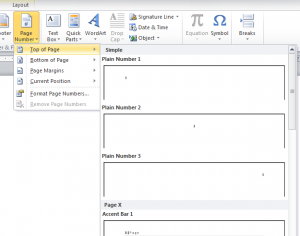
In many books, the header or footer simply contains a page number, and these can be added easily in Word by choosing Insert/Page Number/Top of Page or Bottom of Page, then selecting which position and option you require.

insert page numbers

You may wish to have more information in your header, however. For example, many non-fiction books will have the book title on one side of the page and the author name on the other, so while the left and right pages are consistent throughout they do not match each other. Some may even have the book title on one side and the chapter title on the other, so while the book title side remains consistent throughout, the chapter title side changes for each chapter. At the very least, unless you have the page number bottom centre, it should appear on the outside of each page, so swapping from the left to the right. The first page of each chapter will normally have no header at all.


You can access the Headers and footers options by double clicking in the header or footer area of any page, or by clicking on Insert/Header and choosing the Edit header option, and similarly for the footer area.

header footer toolbar

Here, again, make sure that Different First Page and Different Odd & Even Pages are ticked. Different First Page enables you to leave the first page of each section (each new chapter) without a header.


A very important button on this toolbar is the Link to Previous. While this is turned on, the header in the current section (either odd or even) will be the same as the corresponding header in the previous section, so any change you make to this one will affect that as well. If they are all linked, then changing one will change all. This is the setting we want for the header that’s to be the same throughout – for example having the book title on the left hand (even) page.


Unlinking the headers, by turning off that Link to Previous button, means that you can set each header for that side manually. Use the Previous and Next buttons to skip through the sections. This means that you can set up the chapter title to appear on every right hand (odd) page.

alignment tabs

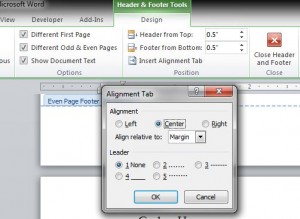
Use alignment tabs to centre the header – on the Header and Footer Tools, select Insert Alignment Tab and choose Center. You will need to add a right alignment tab for the page number when you want it on the right. When putting the number on the left, be careful if your Normal style includes a first line indent – you will need to turn this off for the number or it will appear in the indented position, or apply the non-indented version of Normal.


Page numbers should follow on automatically between sections. You can format their appearance by choosing Header and Footer Tools/Page Number/Format Page Number, should you require a section to be numbered differently, or in a different style. For example, a lengthy preface might be numbered with small Roman numerals, with the actual numbering starting with the text itself.


Check all your headers and footers very carefully (or your proofreader will check them for you) to ensure they are all correct.


Compiling your work from Scrivener

The PDF version of these instructions is here: Compiling your work from Scrivener.


Once you have finished writing your novel (congratulations!) you need to be able to export it from Scrivener for use elsewhere. While it is possible to compile straight to ebook format from Scrivener, I would recommend compiling to an intermediate format such as RTF (which is Word compatible), where you can play with formatting and check for last-minute errors before the final compile.


There are three basic ways you might have organised your files within Scrivener:

You might have just one folder with all your files in.

simple structure

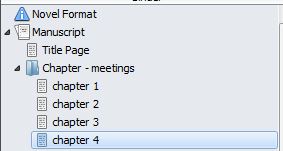
You might have folders for each chapter, each containing at least one scene.

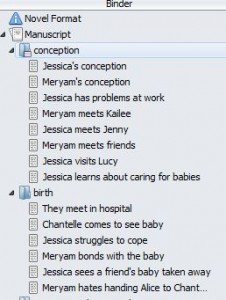
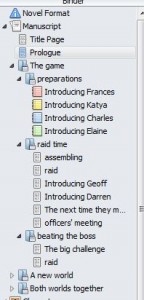
basic structureYou might have a more complicated structure, such as a prologue and parts, each part containing chapters, each chapter containing scenes, plus an epilogue at the end.

complicated structure

You can see I’ve also been playing around with the icons for the scenes! 


The basic structure for compiling is the same, whatever your structure.


compile buttonClick the Compile button on the toolbar, or select File/Compile.


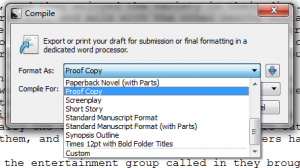
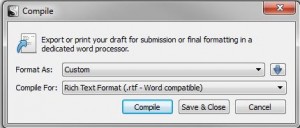
The short version of the dialog box gives you options to choose – for the complicated structure, you need to choose a format that says (with parts). Otherwise choose whichever option you want: ebook, paperback or standard manuscript, for example.

compile dialog

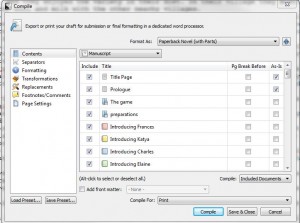
Clicking on the blue down arrow on the right shows the full functionality of the box.

compile dialog full

Under Contents you need to check that all the files you need to include are ticked. Any that don’t fall into the main structure, such as a prologue or epilogue, need the As-Is box ticked.


Scrivener will number any folders as chapters and if you have the part/chapter structure (here you can see a part called The Game containing a chapter called Preparations) then Scrivener will number them accordingly as long as you have chosen a structure with parts, so don’t include chapter/part numbers within the folder names.


There are several tabs of options for Compile, so I suggest you play around with them and see what the end result is. One you particularly need to look at is Transformations.


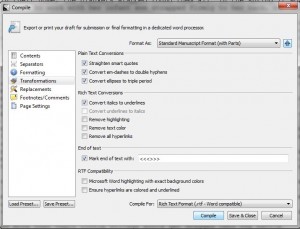
Click on Transformations on the left to see transformation options.

standard compile transformations

Here you see the Transformations options for a Standard Manuscript, which includes straightening smart quotes and converting italics to underlines. You might want these options turned off, depending on what you intend to do with the file.


When you are finished with the options, check the file type you are compiling for and then click on Compile, and you will be prompted to save the file somewhere and give it a name. I would recommend saving as RTF (rich text format), which can be viewed in most word processors.

Be careful!

You now have the Scrivener version of your novel and a compiled version. While some compiled versions, such as ebooks, will not allow you to edit them anyway, there is a big danger with other versions that you make changes to this file and not to the master version in Scrivener. Once you start working on the compiled version, it can be fiddly to get the work back into Scrivener, so be aware of issues if you send a file to a beta reader, editor or proofreader. Make sure that you are prepared to transfer changes back to the Scrivener version, or continue your work on the compiled version only. This is why I recommend using Scrivener to write and edit your novel, then switching to a word processor for the final tidy up, format and proofread before exporting to PDF for print versions or MOBI/EPUB for ebook versions.


Getting started in Scrivener

With Nanowrimo almost upon us, many people are trying out Scrivener for the first time, so I’ve put a guide together to help you. Click on any screenshot to see it larger. You can also download a PDF version Getting started in Scrivener if you would rather print the instructions out to have next to you.


First download and install your Scrivener trial – currently the best link is from http://www.literatureandlatte.com/nanowrimo.php – this is a special nanowrimo trial that will last until 7th December.


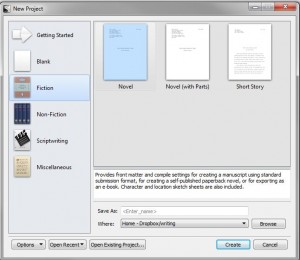
new projectCreating a new project gives you a few options. I would suggest sticking to Fiction for nano if it’s your first time using Scrivener.


Give your file a name and choose where to save it – I always save mine to Dropbox as I can then access it via PC or laptop.


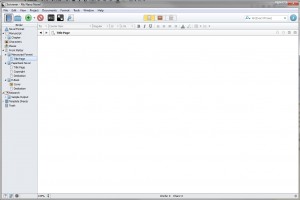
setting up


When you click Create, this is what you will be faced with. On the left is the Binder, which organises all your documents. Use the triangles to expand and contract your structure. Typing happens in the main area.

Building your structure

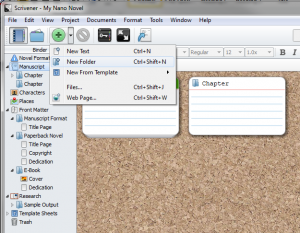
create new folderClick on Manuscript in the Binder. Click on the triangle next to the green Add Item button and choose New Folder. There is already one there, called Chapter.


Name your folders as your Chapter titles.


On each folder, click on the green Add Item button (or on the triangle next to it and select New Text)  to create a scene in the chapter, and give each scene a name.


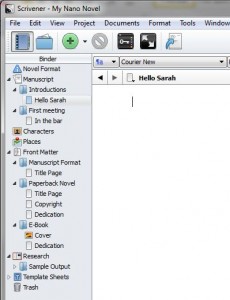
part projectYour organisation can be as complex or simple as you like – here, under Manuscript I have two chapters (folders), each with one scene (text document), but each chapter can contain several scenes. Just add a new one when you need it, via the Add Item button. You can drag and drop folders and files in the Binder to change the organisation.


There is also a folder labelled Research, where you can create and store any documents containing notes rather than actual manuscript. Ignore any other folders for now – just worry about Manuscript and Research.


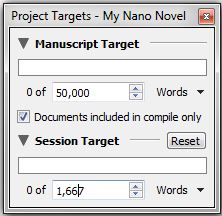
project targetsClick on Project/Project Targets and set up your manuscript target as 50,000 and your session target at 1667 (or whatever your daily/session target is). See those bars change colour as you get closer to your target. Scrivener will keep track of your overall word count for the project and each session, whether you work on one scene or split your time between several.


Click on the scene you want to write and get started! Jump between scenes by clicking on the scene name in the Binder. Add a new scene/chapter as you need it or set up your complete structure in advance; the choice is yours.


Don’t worry about saving – Scrivener saves as you go along. If you are switching machines and using Dropbox or other cloud storage, just give your machine enough time to sync between closing Scrivener and shutting the computer down, and between turning the next one on and opening the project.

Using the Inspector

turn on inspectorIf you want to make fuller use of Scrivener, I suggest you start with the Inspector.


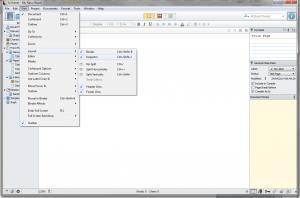
Click on View/Layout/Inspector to turn on the Inspector pane on the right. This gives you options to record information about each section.


InspectorHere I have added a synopsis of the scene. There is meta data that you can play with, to label the type of document (scene, character notes, idea, notes), and a status you can set. You can use the ones already created, or you can create your own by using the Edit button at the bottom of the list of options.

labels


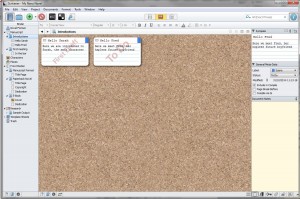
Click on a chapter folder and then Corkboard button on the top middle of the screen to see the synopsis cards. You can drag them around to change their order.


corkboard

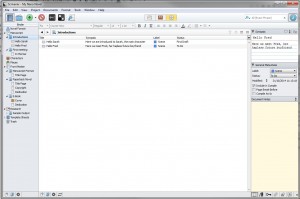
outline viewOr click on Outline View to see a different view of your structure. You might have to resize columns so that you can see all of them in the window. You can use Outline View on your Manuscript and expand each chapter, to get an overview of your complete novel, as well as on individual chapters.


Click back on an individual text file to continue working on that file.


compileIt’s a good idea to compile your project every so often to produce a backup version. Click the Compile button or choose Project/Compile. There are a variety of settings – I usually use these for backups. This produces a straightforward text document that can be read in most word processors.


Most of all, have fun writing!