Author Archives: Lin White

Plotting with Aeon Timeline 2

One of the rewards for nanowrimo this year is a discount off Aeon Timeline. But what use is Aeon Timeline to a novel writer?


I made extensive use of it this year to plan my novel, so here is a basic guide on how I used it. Click on any image to see it larger.

timeline-example

This is a partial view of my completed timeline. You can see the buttons along the top, then the timeline itself, and then events at the corresponding mark on the timeline. Because my novel is set during a school year, it was important to work out term dates and to know what day of the year events took place on.


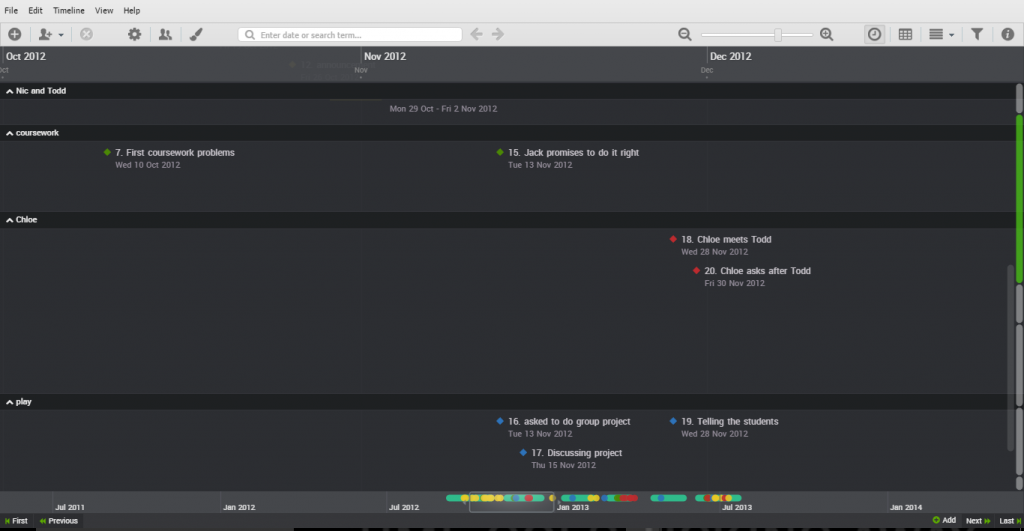
This view shows the story events separated into different arcs.


At the bottom of the window is a timeline graphic, with a sliding bar representing the part that’s visible, and the coloured blobs representing the events. This provides an overview of the spread of your events. I used colour coding for the different arcs involved.
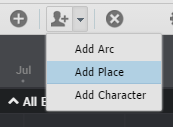
 

add-arcAs well as events, you can add entities to your story – arcs, places or characters, within the fiction template. Arcs help you to keep the different elements straight, while places and characters help you keep track of who’s doing what and where. If you set a birthdate for characters, you can keep track of their ages at different events. This is a feature I didn’t need this time, but relied on a great deal last year.
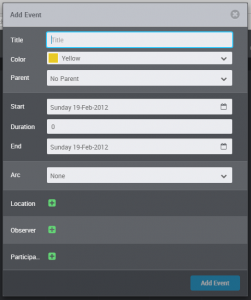


add-eventAdding events to the timeline is easy. Either double click on the timeline, or use the Add event button. The double click method pre-fills the date where you clicked, but you can adjust this at any time.


Fill in the information about your event – at the minimum, you need a title and a date. Choose a colour to represent your event – use colour coding to help you see related events.


Add all the events you need for your story. For each event, you can assign an arc, location, and observers/participants.


info-bar


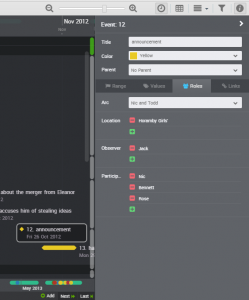
This is an example of an event with several of the boxes filled in.


Clicking on any event on the timeline opens up the event details for you to tweak as necessary.


Tabs provide places to put notes for the scene, such as what the weather is like, or add tags to the event. You can also nest events, but again this is a feature I haven’t used this year.


It’s straightforward to view a story with or without arcs. I used this to create the different story arcs separately, and then view without arcs to see how the different events were interwoven.


timeline-with-arc

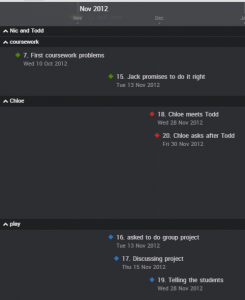
This shows the story events broken down into their separate arcs. This enabled me to check that each arc made sense and events happened in the right order.


If an event needs adjusting, you can either click on it and make amendments in the info pane or just drag the event along the timeline until you reach the right date – a tooltip showing the date makes this easy.
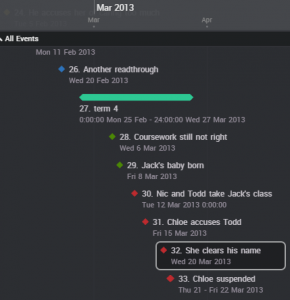


events-with-no-arcAnd this shows the story events interwoven – the coloured blobs indicate what arc they belong to. This enables me to see how the events affect each other, and make sure that there are no issues.


relationship-view

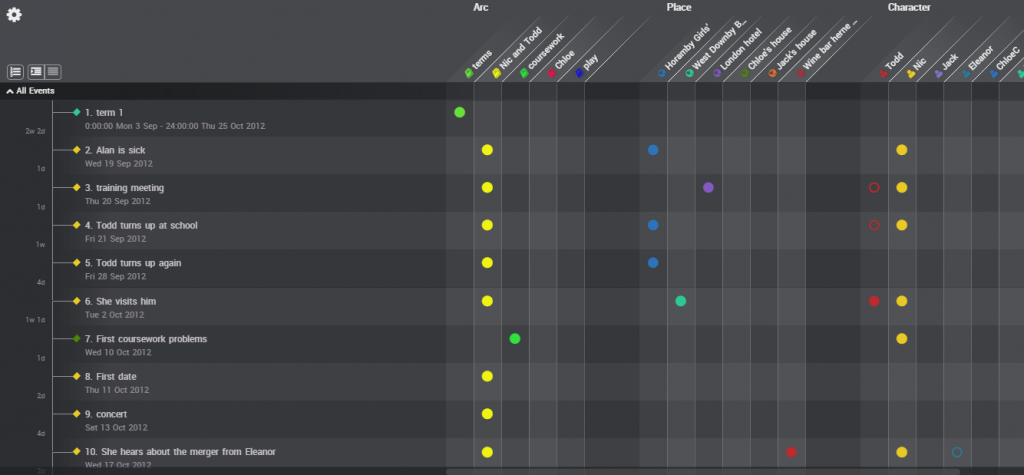
Another view that is useful is the relationship view – a grid indicating events in a list, with markers to show the entities involved. I then used this list to create scenes in Scrivener. All that was left was to actually write them up. I did go back and make changes to the timeline to reflect changes that happened in the novel, to ensure consistency between the two files, but generally the timeline represented the bulk of the planning I needed.


Aeon Timeline 2 will sync with Scrivener, but that’s a feature I haven’t explored yet. For now, the timeline itself is a useful enough tool even without that.


Aeon Timeline 2 also has templates for use with time management projects, legal projects and non-fiction projects – it’s incredibly useful, and the more I explore it, the more useful I find it.



Preparing for nanowrimo

It’s halfway through October, and all round the world, writers are preparing for the massive writing festival that is NaNoWriMo, or national novel writing month, the challenge that sees them aiming for a grand total of 50,000 words on a new project within the 30 days of November.


I have to confess that I’m one of them – each year for the past few years, I’ve bashed out a first draft of a novel during November, and then spent the rest of the year working on it. Each year, the draft I finish is a little more polished than the previous year, and I get a little further through editing. Eventually, my aim is to have several novels all nearing the finished product at around the same time, and then start publishing.


But how do you prepare for such a project? And should you be starting before 1st November anyway?


There are two types of writers, when it comes to nano – known as the planners and the pantsers. In fact, these are just two ends of the spectrum, and most people sit some way along the route between. Planners will plan out their story in great detail, world building, character building, plotting out their story. J.K. Rowling has released sheets showing how she planned out the Harry Potter stories in detail. Pantsers will fly by the seat of their pants, starting with a basic idea (or even less than that), and just seeing how it develops. Stephen King is a great proponent of that approach.


This is where I find Scrivener comes in handy: I’ll work out the rough outline of my story, often dividing it into three parts, corresponding to the three act structure. I’ll budget out the words for each part, and create sections for each scene I think needs to happen. The index cards hold a rough summary of the action for that scene, and I plan on between 1000 and 2000 words per scene.


Then when I get to November, I aim to fill in at least one scene each day, providing a structured journey from beginning to end but with flexibility should the story develop in an unexpected way – if your characters don’t rebel at some point in your story and do something you hadn’t planned, then maybe they’re not real enough!


The important thing when tackling nanowrimo is to remember that the aim is to create a first draft of a novel. It is not to create a polished, well-written manuscript that’s ready to send off to agents and publishers. There’s lots of work still to do once that first draft is finished.


Nor should you be worried if the story doesn’t achieve all you hoped for it. That’s what the rest of the year is for. The aim is to bash through your story, become completely involved in it and figure out what works and what doesn’t. Once you’ve finished, you might be able to work with what you have, or it might mean pulling it apart completely and restructuring. Whichever level it’s at, you’ll have had 50k words’ worth of work put into it, and you’ll have a much better idea of what the story needs.


So enjoy your nano prep and enjoy your writing – just be prepared to keep working on it for the rest of the year!


Producing a book

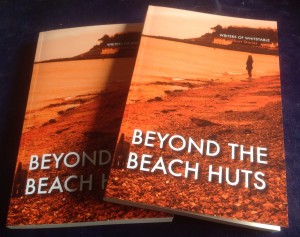
Beyond the Beach HutsA writing group I’m part of is currently celebrating the release of its first book – Writers of Whitstable has produced a collection of short stories all set in the town. The collection includes a variety of genres, from around a dozen different writers.


The project started around September last year, when it was suggested we produce a book to release in conjunction with Whitlit, a local writing festival. We came up with a theme – all stories were to be set in the town of Whitstable or have some connection to it – and the title – Beyond the Beach Huts, suggesting an insider’s view of the town – and writers each came up with their own ideas.


Stories were brought to writing group for critique (we send stories around a week before the meeting, so on the evening we can discuss them) and then the writers continued to work on them privately, returning them for further critique if they felt they needed it. We had a few months for this process, with final copy being in by the middle of February.


My role in all this, apart from writing my own stories to contribute, was to accept final versions, give them a proofread/very light edit, send them back for approval, and then assemble them into a book. An editorial meeting between the leaders of the project led to a running order for the stories, and final proofs were sent out for everyone to check their own pieces and also glance over the rest of the book. I was also responsible for obtaining an ISBN and dealing with the publishing side.


Meanwhile, one of our members worked on the cover art, coming up with an eye-catching cover that we’re all very pleased with.


Once cover and interior PDFs were approved, we sent them off to a printer who specialises in books, and three weeks later we were proudly opening three boxes of books.


Minor adjustments to the files made them suitable for Createspace, Amazon’s Print On Demand service, and for ebook, so now as well as copies to sell at local events, we have the book available on Amazon in both paperback and kindle versions.


It’s been a really fun project to work on, and the big debate now is whether to do a similar project next year, and if so, what the theme should be.


Formatting for ebook

The process of formatting for ebook starts in the same way as formatting for print; in fact, ideally I’d be working from the same Word file, and preparing it for both types of formatting by first ensuring all the formatting is done through styles, and not just ad-hoc. Once the Word file has styles applied throughout, importing it into Jutoh, the program I use for ebook formatting, is straightforward.


Within Jutoh, I’m prompted to fill out a form containing the metadata for the book, including author and publisher details, genre and information, and then choose which files to import for the main text and the cover. With styles applied, I can set the document to split at the chapter heading style, and then complete the import.


Now I need to go through the document, checking the formatting has imported properly, making sure the splits are at the right places – while the chapters should split automatically, the front matter and back matter often need attention – and ensuring that any blank lines at the end of chapters have been removed. While these can easily go unnoticed within a print book, there’s a risk that a single blank line at the end of a chapter, falling at the wrong place, will appear as a complete blank page in an ebook.


The options for variation of text in an ebook are very limited. While in a print version almost anything can be achieved (and one of my projects is exploring the possibilities in a fun way!), in an ebook there is only really relative font size as an option, as the reader can (and should be able to) override font and font size choices for their own reading comfort. Another trick that I’ve used to make text stand out is to block-indent rather than just indent the first line of the paragraph, but ebook readers vary in how they handle indents, so varying indent size or adding a right indent isn’t a viable option.


With most fiction ebooks, the table of contents can be handled automatically, while for others or for non-fiction, I often have to handle the table of contents separately, ensuring that links are provided for the parts that need links, that they are displayed consistently and that all links point to the right place.


Images need checking to ensure they are the right size. While Jutoh offers a facility for resizing images, this can be inconsistently handled across readers, and it is far better to ensure the images are correct before importing.


Once I’m happy with everything, it’s time to hit the export button. I can choose the export type (epub or mobi, usually) with the click of a button, and the file is created.


That’s not the end, of course! There’s still viewing on different screens, checking the front matter and back matter are displayed correctly, making sure the table of contents works if I’ve had to handle it separately, and skimming through to see whether any special formatting is handled right. I have a few different devices available, from ipad and iphone to kindle touch and kindle keyboard, and so I’m able to check how they each deal with any issues.


Book formatting for print

One task I’m often asked to do is to produce a version of a book for print. So what does this involve?

Preformatting

Firstly, I have to scan through the document to see if there are any tricky bits – sometimes a book will include sections such as letters, or newspaper articles, or something else that needs to be treated differently from the main text. There might also be areas where italics are used, for example. I apply styles to these, and to the chapter headings, and to anything else that is in other than the normal body font.


Some books bring real challenges, and it’s important to have an ongoing dialogue with the author over how he/she wants the issue handled.

Typesetting

The next step is to create the document to the right size in InDesign and import the Word file. I then check through the import, making sure that all the styles have made it across safely and all chapters start on a new page.


Next there’s a tweak of settings like hyphenation, and orphans and widows (usually issues with paragraphs split across a page break unevenly), and a check that we don’t have issues like blank pages or just one or two lines on the last page of a chapter. With InDesign, I have much more flexibility than in Word to squeeze an extra word on a line or spread the paragraph out a fraction so that more is carried over to the next line.


The beauty of using styles for the document is that it becomes very easy to change whole chunks at a time – if the author decides to go up or down a font size, for example, it can usually be changed in a single place. A change of fonts for the chapter headings is also achieved in one step, or adjusting how any special issues are addressed.


When I’m happy with the main body of the book, I can sort out the half-title, title page and imprint page, and anything else that’s needed for the front matter and end matter. There’s also the headers, footers (if needed) and page numbers to sort out, and checking that these only appear on the pages they’re needed.

Export and check

I export to PDF and scan through the file to make sure that all is as it should be, and then send off the PDF to the author for them to check. With InDesign, fonts are embedded in the file, meaning that the viewer will see the document as created, which isn’t always the case with files produced from Word. Ideally, a proofread would be carried out at this stage, to check for formatting issues as well as text issues. Sometimes I’m asked to do this, while at other times it remains something for the author to deal with.


Any issues can be dealt with fairly quickly, as the bulk of the work is done, and then I can create a final PDF if needed. By this point, it’s clear how many pages the book will have, which is vital information for creating the spine of the cover design. Again, I have some flexibility in page count as I can adjust settings easily to add pages (removing is trickier to do without affecting the overall look of the text).

How can an author help?

These days, authors often create the document with formatting as they imagine it should be. While traditional publishers might frown on this, I find it a help to see what the author has in mind, as long as it’s not too fancy.


It always helps if I’m prewarned about any issues that might arise, as I can be on special lookout.


If you know how to use styles, then applying them in Word rather than using ad-hoc formatting is useful.


Above all, it helps if the author is prompt with checking through proofs or letting me know if there’s a delay. As in  many things, communication is the key to success!


Writing strong scenes

When writing your novel, it’s important that each scene carries its weight. How about using a checklist? Each time I look at a scene, I ask myself:

  • How has this developed the storyline?
  • What have I learned about the characters?
  • What have I learned about the setting?
  • How have I developed the theme of my novel?
  • Is the right person telling the story here?

Do you have any other suggestions for ensuring a scene is strong?


How much does an editor cost?

One concern of a writer getting ready to publish is how much an editor will cost. I’ve seen much resentment on all sides, from professional editors accused of high fees, from writers convinced the editor is charging far too much, and from those who charge very low fees and are surprised that others get upset.


So just what is a reasonable fee editing a novel? First of all, ask yourself some questions.

How long have you spent on your novel?

Just for fun, take a rough guess at how many hours you’ve spent on your novel. Bear in mind that in the NaNoWriMo challenge, some writers have managed to churn out 50,000 words in 24 hours, working flat out. Then there’s the time spent staring at the screen, trying to work out the best way of phrasing something. And the time spent working out your plot and whether things happen in the right order.

How long would it take to read through your novel?

If a reader were to sit down and read through it, how long would it take them? Okay, reading speeds vary, but you can get a rough idea. If we take a very rough estimate of 100 pages per hour, at 250 words per page, that’s 25k words per hour. And that’s reading very fast, not taking in every detail. So for a nano novel you’re looking at two hours minimum for a readthrough. That’s the reading time for an edited, published novel, though, not for a raw manuscript that still might need a lot of work. That can easily take four or five times that reading time.

How long would it take to edit your novel?

How long do you think it would take for someone to read through your novel carefully, line by line, making notes, checking every word, ensuring it all makes sense, ensuring continuity, and becoming as familiar with the text as you are?  This is very hard to estimate, so I would suggest that as an absolute minimum, take the reading time and multiply it by ten. The time taken will vary widely with the quality of the original writing, of course. Some texts only need a clean-up, while others will need a lot more work, entailing not only close reading but constant checking backwards and forwards. Novels written by someone who is not a native English speaker can be even more complex.

What’s a decent hourly rate?

The minimum wage in the UK is around £7 an hour. The recommended rate for editing in the UK is £20 – £30 an hour plus, depending on level of edit needed and quality of writing to be edited (Society for Editors and Proofreaders).  Editors with a great deal of experience might well ask for a higher fee, while some jobs are more complex than others. Don’t forget that an editor is also usually self employed, so responsible for covering their own tax, pension, sickness cover, holiday pay, training, national insurance and costs of running their office, such as heating and lighting. Admin also takes up part of their time, so time available to do paid, chargeable work is reduced accordingly. One estimate is that of any hourly fee they take in, around 75% maximum is actual net income, so here we’re talking about earning around £15 an hour net.


Look at those figures in relation to your estimate of time taken. What do you notice? For your nano novel, we’re talking about a minimum of around 20 hours of editing, at £140 minimum wage or £600 recommended rate. And most novels are more like twice that size. As the size grows, so does the complexity of the edit. For the 100k novel, we’re looking at a very rough estimate of £280 ($360 approx) at minimum wage and £1200 ($1500 approx) recommended rate. And that’s  for the bare minimum level of work on a very clean original. If you’re paying a lot less than this, then what’s happening?

Why are some editors much cheaper?

You will always be able to find editors offering to work on your novel for a low fee. This probably means one of the following:

  • They’re just setting out in business and trying to get experience and testimonials.
  • They cut corners and don’t give your work the time it needs (some may well just run the spell and grammar checks and claim to have edited your work).
  • They’re just editing as a hobby, and the money is an extra bonus.

Each group has its own drawbacks:

  • The first group lack experience and are likely to be inundated with requests. They will either buckle under the pressure or soon find they can’t afford to work at that rate for long and their fees will rise with their experience level.
  • The second group – well, just don’t expect them to add much quality to your novel. If you’re lucky, they won’t actually do any harm.
  • The third group forms more of a grey area. On the one hand, if your writing is a hobby, then maybe a hobby editor is suitable. I’m sure there are some out there who can consistently offer a good service at or near minimum wage. On the other hand, they are likely to lack the experience that a professional editor has gained over many years of working in the business, or they might be tempted to rush through the job or not understand the full implications of editing.

How hard is it to edit?

Editing is a highly skilled job, but a good edit is invisible, so it’s far too easy to get the idea that anyone can do it. A little knowledge can be a dangerous thing – be very careful of editors who apply rules rigidly, for example. In all writing, but especially with fiction, an editor needs to understand when a rule may be broken, and be aware of regional variations in usage, among many other issues.


Editing is not just a question of being good at grammar, punctuation and spelling. Your editor should also be drawing up a style sheet – noting anything from whether to use anymore or any more, or where to hyphenate, to whether John has blue eyes or brown, and the fact that Jane is left-handed and lives in a bungalow. The style sheet can be very complex, for example if writing fantasy, and will be used to check consistency throughout the manuscript in conjunction with a style guide that advises the editor on whether capitalisation is needed, where italics should be used, how to deal with abbreviations, and many other issues.


If they’re carrying out developmental editing, they may well also have many other tools such as a timeline they can check against and a way of checking the progress in each scene for balance between action and backstory.


A fiction editor also needs to understand the intricacies of issues such as consistent point of view, consistent use of tenses and how to retain the author’s style while polishing it ready for publication.


Always remember that there are three aspects to editing, as in many things: good, cheap and fast. You can always get one of the three, and usually two. But three out of three? Never! Which are you willing to sacrifice, and which is most important to you and your novel?


Your first chapter

Within the first few pages of a book, a reader decides whether to continue or to give up. Writers focus a lot of attention on those first few pages, and with good reason. But what should you be looking for?


Don’t get stuck on your first chapter. Write something, anything, and then keep going on the rest of your novel. But when it’s time to edit your work, pay close attention to that first chapter, and how you use it to set up the rest of your book.


One issue that I often discover when I beta read is that at first I struggle to find my way in the book world. Is this a fantasy world? Is it our world? Are we talking current day, past or future? Who are these people? What’s the relationship between them? Who should I be focusing on?


These days, we tend to prefer books that go straight into some sort of action, but is that action detailed enough for readers to pick up what they need? You don’t have to explain everything at once, but make sure there’s enough detail to be able to follow.


Book two (or three or four) of a series provides a special problem. It’s so tempting to follow straight on from the previous book, but you know these characters and situations far better than the reader, who might have a large time gap between books. Are they going to remember that character? Are they going to remember the setting? Do they understand the significance of that event? What about the reader who glances at book two without realising it’s a sequel? Will they be interested enough to find the backstory, or will they be completely lost?


All this is why putting a manuscript to one side for a while and then reading with fresh eyes is a very good idea. Then make sure you read what’s actually written, and you don’t fill in the blanks with your memory. Is it clear who that person is? Have you indicated the time, the setting, the main drive of the story? Is the genre clear (or at least hinted at) from the start?


Sometimes, all it takes is a few extra words, or an extra scene, to make the difference between an opening chapter that leaves the reader floundering and one that pulls them onwards, already deeply engrossed in your story.


Writing books – Writing Deep Point of View

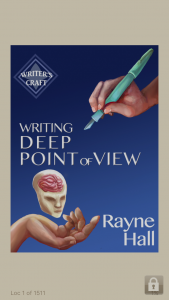
2016-01-26 08.47.57Point of view is one technique that many beginning writers struggle with. Writing Deep Point of View by Rayne Hall is number 13 of a series of 16 Writer’s Craft books. This one explains the appeal of deep POV to the writer and to the reader, and guides you through strategies to hook the reader and pull them into the story and into the narrator’s mind.


Twenty chapters take you through topics such as the sensory experience, trigger and response, male and female POV, switching POV, and cover topics such as how to get across what other characters feel and what’s going on elsewhere in the world.


The book is available in both kindle and paperback formats, although the kindle version offers much better value for money. I found it very useful as a reminder of the purpose and techniques of deep point of view, and it covers the topic in suitable depth, with plenty of examples. As a bonus, two complete short stories by the author illustrate the strength and flexibility of deep point of view in getting to the heart of a story and in twisting traditional stories.


Each book in the Writer’s Craft series covers one aspect of writing in great detail, and together they serve as handy, useful guides.


Writing books – Basic English Grammar for Dummies

IMG_1605[1]Part of an editor’s job is to ensure that the grammar in a text is sound, but it is still a good idea for writers to be as confident as they can be in their own writing, so that they can make their message clear. Basic English Grammar for Dummies by Geraldine Woods provides a way for writers to check up on the basic rules. Working your way through the book, trying out the exercises and checking your answers, will boost your confidence and clarify those pesky rules around apostrophes, capital letters and prepositional phrases, as well as providing guidance on appropriate style issues in different situations.


One test of a grammar book is how it deals with the pesky serial comma; in this book, it is explained as optional in UK English, used only when it helps to clarify the text, and always used by most writers in US English.


Sections include Getting Started with Basic English Grammar, Creating Correct Sentences, Punctuation and Capitalisation, Grammar in Action (writing in electronic media, writing at school or work etc), Common Errors and the Part of Tens (quick lists of ways to improve, mistakes to avoid etc).


There are all the usual features of a Dummies book – tips, warnings, things to remember – and the tone is light and conversational, without getting silly or talking down to the reader.


This book is written primarily for UK English, so if you use a different format then just be aware that this might account for any differences. However, the differences are few enough that this book would be useful for anyone writing in any variant of English.